WPRuby Logo WPRuby
Log in Get started
  • Plugins
  • Themes
  • Docs
  • Blog
    • eCommerce
    • Plugins
    • How to
    • Coding
  • Affiliate Area
  • Contact Us
  • About Us
  • Plugins
  • Themes
  • Docs
  • Blog
    • eCommerce
    • Plugins
    • How to
    • Coding
  • Affiliate Area
  • Contact Us
  • About Us

WPRuby Account

4
  • How to upgrade your license
  • How to renew your license
  • How to change your plugin’s license domain
  • How to cancel your subscription.

WooCommerce Australia Post Shipping Method Pro

14
  • Installation
  • How to activate your Australia Post Pro license
  • How to Upgrade from Free to Pro
  • Australia Post Zone Settings
  • Australia Post Global Settings
  • Australia Post Tracking
  • Pre-Paid Satchels
  • How to Mark a Product to be Shipped Individually?
  • TroubleShooting and Common issues
  • Available WordPress Actions and Filters
  • [Labels Pro] How to connect the plugin with your MyPost Business account
  • [Labels Pro] How to connect Labels Pro with your eParcel account
  • [Labels Pro] How to print labels and create shipping orders.
  • [Labels Pro] How to Mark a Product as Containing Hazardous Materials?

WooCommerce Custom Payment Gateway Pro

11
  • Getting Started
  • Custom Payment Gateway Settings
  • Custom Checkout Field Builder
  • Conditional Display Rules
  • Sending Payment Data to an External API
  • How to Create a Pay by Invoice Payment Method
  • How to Create a Manual Payment Link or Review-Based Payment Method
  • Troubleshooting
  • Frequently Asked Questions
  • Security and Sensitive Payment Data
  • How to Upgrade from Free to Pro

WooCommerce Royal Mail Shipping Calculator Pro

4
  • Installation
  • Settings
  • TroubleShooting and Common issues
  • How to activate your plugin license

Controlled Admin Access Pro

3
  • Available Actions for a Restricted Admin
  • Installation
  • Settings

WooCommerce Address Guard Pro

7
  • Get Started
  • Configuring Address Providers
  • Configuring Checkout Validation
  • Creating Address Rules
  • Customizing Customer Messages
  • Using the Address Tester
  • Reviewing Address Quality Inside WooCommerce Orders

WooCommerce Simple Table Rates Pro

8
  • Installation
  • Settings
  • Rules and Actions
  • How to Setup Weight Based Shipping
  • How To Setup Shipping By Shipping Class
  • How to Setup Shipping by Cart Total
  • How to Setup Shipping by Product
  • How to Setup Shipping by Product Category

WooCommerce Pack IQ

5
  • Installation
  • How to activate your plugin license
  • How to add a new box
  • How to change the boxes weight and dimensions units
  • How to view the packing results

WooCommerce Restricted Shipping and Payment Pro

4
  • Installation
  • Setting Up Shipping Methods Conditions
  • Available Shipping & Payment Rules
  • Setting Up Payment Gateways Conditions

Affiliate Butler PRO

11
  • Installation and Upgrade
  • Quick Start Guide
  • Managing Auto Links
  • Link Types
  • Short Links
  • Auto Link in the Block Editor
  • Statistics
  • Import and Export
  • Settings
  • Frequently Asked Questions
  • Developers

WooCommerce Adyen Payment Gateway

2
  • Setup the Adyen payment gateway
  • How to configure Adyen Webhook notifications? 

WooCommerce Free Shipping Per Product

2
  • Installation
  • How to setup free shipping for a certain product

WooCommerce UPS Shipping Method Pro

4
  • Installation
  • UPS Zone Settings
  • UPS Global Settings
  • How to get the UPS Access Key?

Delivery Promise for WooCommerce

9
  • Getting Started
  • Understanding Processing Time vs Transit Time
  • Setting the Cutoff Countdown
  • Configuring Default Delivery Estimates
  • Creating Delivery Rules
  • Setting Working Days and Holidays
  • Using Rule Presets
  • Product-Level Lead Times
  • Why the “Order Within” Countdown Is Not Showing

Cartavera

16
  • Cartavera documentation
  • Install Cartavera
  • Activate your licence
  • Import a starter site
  • Styles, colours and fonts
  • Headers and footers
  • The homepage
  • Catalog and filters
  • The product page
  • Cart and checkout
  • Translation and right-to-left languages
  • Child themes
  • Hooks and filters reference
  • Troubleshooting
  • FAQ
  • Changelog

Candy Shop

14
  • Candy Shop documentation
  • Install Candy Shop
  • Activate your licence
  • Import a starter site
  • Set up your products
  • Food information and allergens
  • Shop pages and filters
  • Styles, colors and fonts
  • Headers, footers and menus
  • The homepage
  • Child theme
  • Hooks and filters
  • FAQ
  • Changelog

Foliowick

16
  • Foliowick documentation
  • Install Foliowick
  • Activate your licence
  • Import a demo store
  • Authors and author pages
  • Book details and editions
  • Genres, reading lists and the Editor’s Pick
  • Secondhand copies and forthcoming books
  • Shop pages, search and book pages
  • Styles, colors and fonts
  • Headers, footers and menus
  • The homepage
  • The journal and editorial pages
  • Hooks and filters
  • FAQ
  • Changelog

Gemelune

14
  • Gemelune documentation
  • Install Gemelune
  • Activate your licence
  • Import a starter site
  • Metals, sizes and swatches
  • Size guide, delivery and care pages
  • Shop pages, product cards and product pages
  • Styles, colors and fonts
  • Headers, footers and menus
  • The homepage
  • Child theme
  • Hooks and filters
  • FAQ
  • Changelog

Formafern

15
  • Formafern documentation
  • Install Formafern
  • Activate your licence
  • Import the demo store
  • Finishes and swatches
  • Dimensions, materials and care
  • Rooms and Shop the Room
  • Shop pages, product cards and product pages
  • Styles, colors and fonts
  • Headers, footers and menus
  • The homepage and editorial pages
  • Child theme
  • Hooks and filters
  • FAQ
  • Changelog

Pawtani

15
  • Pawtani documentation
  • Install Pawtani
  • Activate your licence
  • Install a starter site
  • Pets, sizes, flavours and product facts
  • Size & fit guides
  • Shop pages, filters and product pages
  • Repeat purchases, subscriptions and wishlists
  • Styles, colors and fonts
  • Headers, footers and menus
  • The homepage
  • Child theme
  • Hooks and filters
  • FAQ
  • Changelog

Deep Insights for WooCommerce

19
  • Getting Started with Deep Insights for WooCommerce
  • Upgrading from Woo Insights
  • Importing Your Order History
  • Dates, Comparisons and Filters
  • Revenue Report
  • Products Reports
  • Customer Reports
  • RFM Customer Segments
  • Retention and Cohorts
  • Profitability and Cost of Goods
  • Subscriptions Analytics
  • Inventory Intelligence
  • Shipping, Discounts and Refunds
  • Automated Insights
  • Settings Reference
  • Why Numbers Can Differ from WooCommerce Analytics
  • Troubleshooting
  • Privacy, Security and Updates
  • Developer Hooks
View Categories
  • Home
  • Knowledge Base
  • Affiliate Butler PRO
  • Auto Link in the Block Editor

Auto Link in the Block Editor

Waseem
Updated on November 15, 2026

2 min read

0:00 / 1:51
  • View as Markdown Open this page as plain Markdown (opens in a new tab)
  • Open in ChatGPT Ask questions about this page (opens in a new tab)
  • Open in Claude Ask questions about this page (opens in a new tab)
  • Open in Google AI Studio Ask questions about this page (Google account required) (opens in a new tab)

You can create an auto link without leaving the post you’re writing: select a word in the block editor and turn it into an auto link.

Table of Contents

Toggle
  • Add an auto link from the editor
  • Good to know
  • Disable the auto links of a post

Add an auto link from the editor

  1. In a paragraph, heading or list, select the word or words you want to link.
  2. In the block toolbar, open the More menu (the arrow next to the link button) and click Auto link.
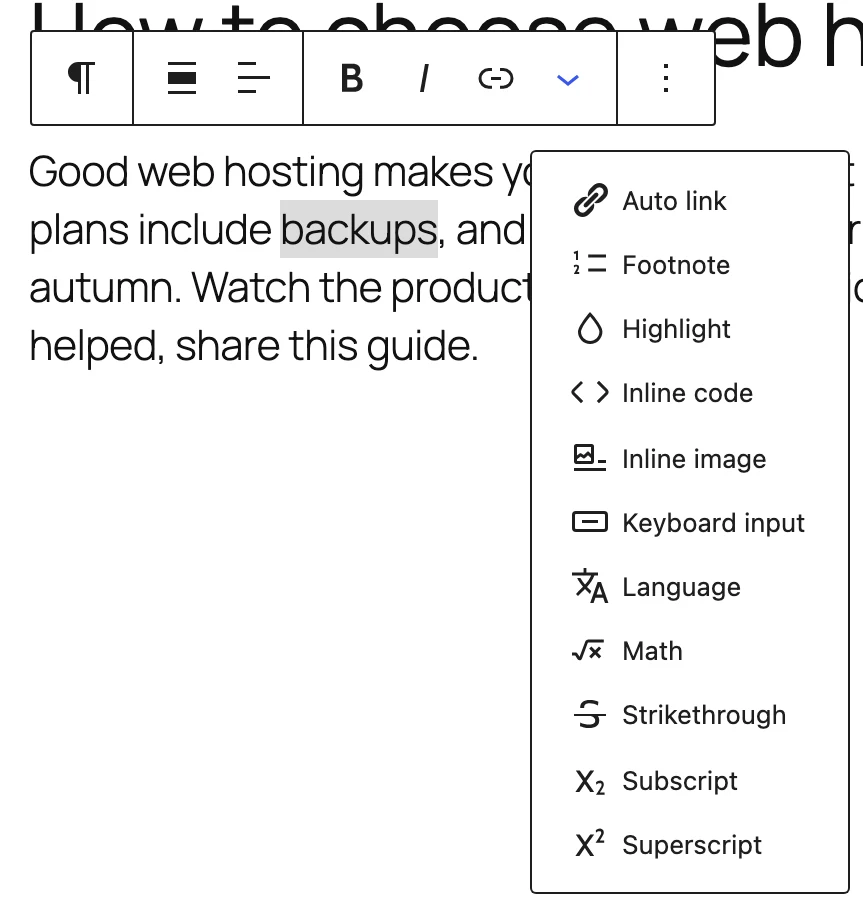
    The Auto link item in the block toolbar
  3. The selected text is already a keyword. Add more keywords if you like.
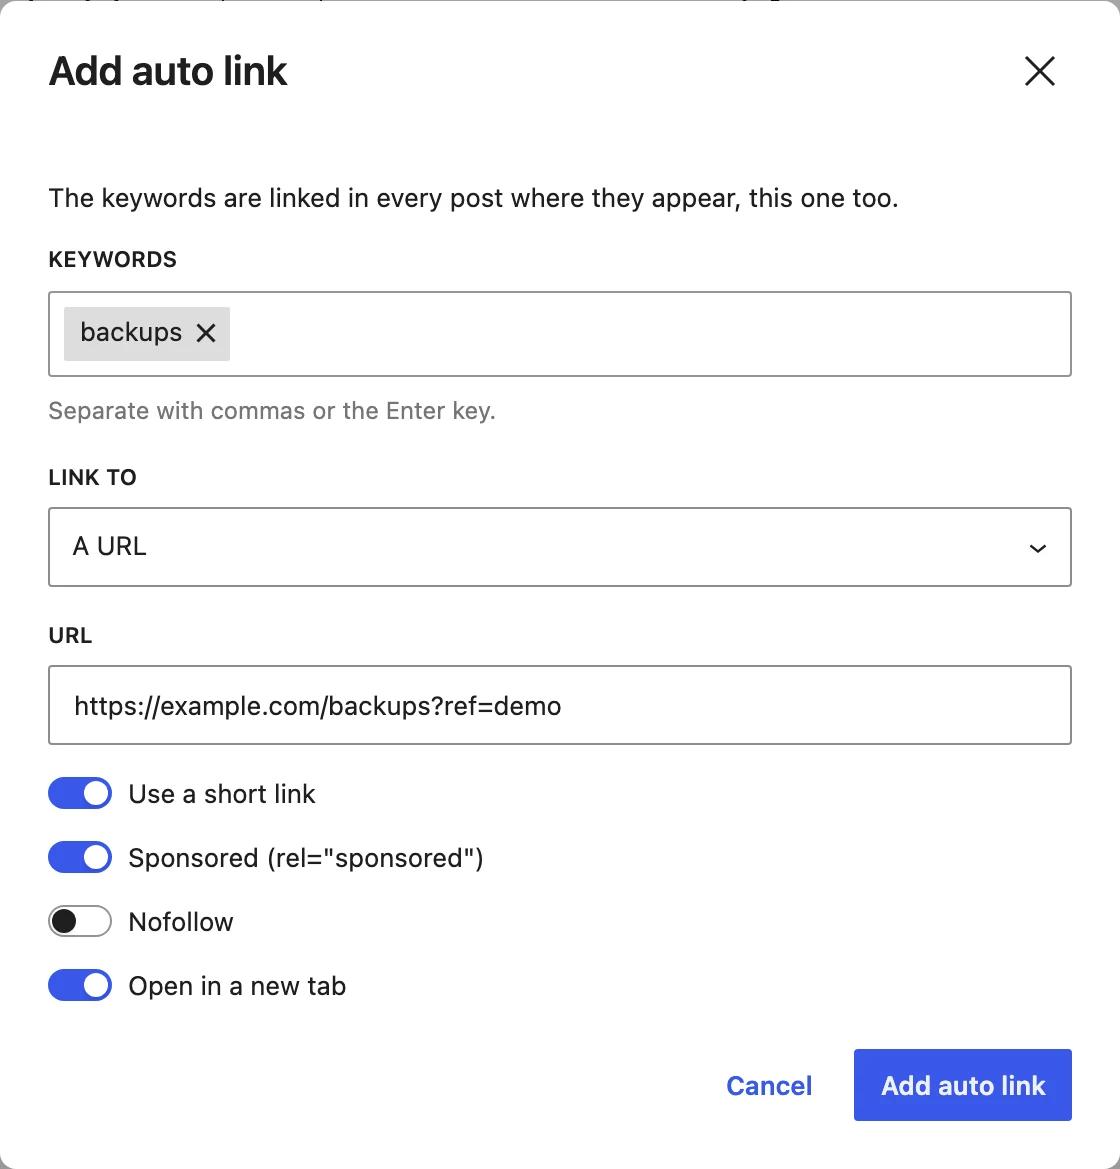
    The Add auto link dialog
  4. In Link to, choose A URL and paste the address, or A post or page of this site and pick it by its title.
  5. Adjust Use a short link, Sponsored, Nofollow and Open in a new tab. They start with your new link defaults.
  6. Click Add auto link.

A message at the bottom of the screen confirms the link, with an Edit link button that opens it in the full link editor.

Your post isn’t changed: like every auto link, the keywords are linked when the post is shown, in this post and in all the others where they appear. Preview the post to see the link.

Good to know

  • The Auto link item is shown to the users who can write posts, on the post types where auto links are enabled.
  • If a keyword already belongs to another link, or the URL isn’t valid, the dialog says so under the field.
  • For the other link types (popups, galleries, maps…) and the short link options, use Affiliate Butler → Add New.
  • The button is part of the block editor. With the Classic Editor plugin, add your links in Affiliate Butler → Add New.

Disable the auto links of a post

To keep a post free of auto links, open the Post tab of the editor’s sidebar, find the Affiliate Butler panel and turn on Disable auto links in this post, then update the post.
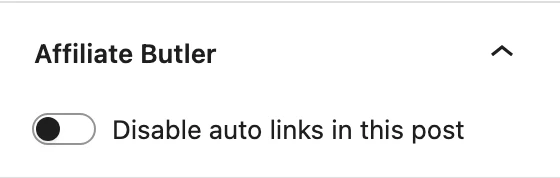
The Affiliate Butler panel in the editor sidebar

With the Classic Editor, the same option is in the Affiliate Butler box in the right column.

Short LinksStatistics
WPRuby Logo WPRuby

In 2015, WPRuby was established as an independent agency where we focus on producing and supporting many WordPress plugins. Each product we develop is simple to use and easy to customize and backed by awesome support and regular updates.

Resources

  • Knowledge Base
  • Affiliate Area
  • About Us
  • Nomad Jar
  • GarnerDocs
  • UnavailableToday

Legal

  • Privacy Policy
  • Terms of Use

Follow us

  • Github
  • X.com
  • LinkedIn
  • Facebook

© 2026 - WPRuby