WPRuby Logo WPRuby
Log in Get started
  • Plugins
  • Docs
  • Blog
    • eCommerce
    • Plugins
    • How to
    • Coding
  • Affiliate Area
  • Contact Us
  • About Us
  • Plugins
  • Docs
  • Blog
    • eCommerce
    • Plugins
    • How to
    • Coding
  • Affiliate Area
  • Contact Us
  • About Us

WPRuby Account

4
  • How to upgrade your license
  • How to renew your license
  • How to change your plugin’s license domain
  • How to cancel your subscription.

WooCommerce Australia Post Shipping Method Pro

14
  • Installation
  • How to activate your Australia Post Pro license
  • How to Upgrade from Free to Pro
  • Australia Post Zone Settings
  • Australia Post Global Settings
  • Australia Post Tracking
  • Pre-Paid Satchels
  • How to Mark a Product to be Shipped Individually?
  • TroubleShooting and Common issues
  • Available WordPress Actions and Filters
  • [Labels Pro] How to connect the plugin with your MyPost Business account
  • [Labels Pro] How to connect Labels Pro with your eParcel account
  • [Labels Pro] How to print labels and create shipping orders.
  • [Labels Pro] How to Mark a Product as Containing Hazardous Materials?

WooCommerce Custom Payment Gateway Pro

11
  • Getting Started
  • Custom Payment Gateway Settings
  • Custom Checkout Field Builder
  • Conditional Display Rules
  • Sending Payment Data to an External API
  • How to Create a Pay by Invoice Payment Method
  • How to Create a Manual Payment Link or Review-Based Payment Method
  • Troubleshooting
  • Frequently Asked Questions
  • Security and Sensitive Payment Data
  • How to Upgrade from Free to Pro

WooCommerce Royal Mail Shipping Calculator Pro

4
  • Installation
  • Settings
  • TroubleShooting and Common issues
  • How to activate your plugin license

Controlled Admin Access Pro

3
  • Available Actions for a Restricted Admin
  • Installation
  • Settings

WooCommerce Simple Table Rates Pro

8
  • Installation
  • Settings
  • Rules and Actions
  • How to Setup Weight Based Shipping
  • How To Setup Shipping By Shipping Class
  • How to Setup Shipping by Cart Total
  • How to Setup Shipping by Product
  • How to Setup Shipping by Product Category

WooCommerce Address Guard Pro

7
  • Get Started
  • Configuring Address Providers
  • Configuring Checkout Validation
  • Creating Address Rules
  • Customizing Customer Messages
  • Using the Address Tester
  • Reviewing Address Quality Inside WooCommerce Orders

WooCommerce Pack IQ

5
  • Installation
  • How to activate your plugin license
  • How to add a new box
  • How to change the boxes weight and dimensions units
  • How to view the packing results

WooCommerce Restricted Shipping and Payment Pro

4
  • Installation
  • Setting Up Shipping Methods Conditions
  • Available Shipping & Payment Rules
  • Setting Up Payment Gateways Conditions

Affiliate Butler PRO

9
  • Installation and Upgrade
  • Quick Start Guide
  • Settings
  • Keywords Management
  • Installation
  • Frequently Asked Questions
  • Files Structure
  • Links Types
  • Statistics

WooCommerce Adyen Payment Gateway

2
  • Setup the Adyen payment gateway
  • How to configure Adyen Webhook notifications? 

WooCommerce Free Shipping Per Product

2
  • Installation
  • How to setup free shipping for a certain product

WooCommerce UPS Shipping Method Pro

4
  • Installation
  • UPS Zone Settings
  • UPS Global Settings
  • How to get the UPS Access Key?

Delivery Promise for WooCommerce

9
  • Getting Started
  • Understanding Processing Time vs Transit Time
  • Setting the Cutoff Countdown
  • Configuring Default Delivery Estimates
  • Creating Delivery Rules
  • Setting Working Days and Holidays
  • Using Rule Presets
  • Product-Level Lead Times
  • Why the “Order Within” Countdown Is Not Showing
View Categories
  • Home
  • Knowledge Base
  • WooCommerce Australia Post Shipping Method Pro
  • [Labels Pro] How to print labels and create shipping orders.

[Labels Pro] How to print labels and create shipping orders.

Waseem
Updated on August 5, 2026

1 min read

Before you start, add your Australia Post credentials in WooCommerce → Australia Post Centre → Settings.

  • MyPost Business: How to connect the plugin with your MyPost Business account
  • eParcel: How to connect Labels Pro with your eParcel account

After setup, open any WooCommerce order and use the Australia Post Labels Printer box. Shipments and labels are linked to that order, and you can create multiple shipments per order.

The workflow is: Review Shipments → Calculate Prices → Generate Labels → Download


Table of Contents

Toggle
  • 1. Addresses
  • 2. Shipments
  • 3. Labels
    • eParcel
    • MyPost Business
  • 4. Shipping Orders (Labels Orders)
    • Tip: Bulk printing

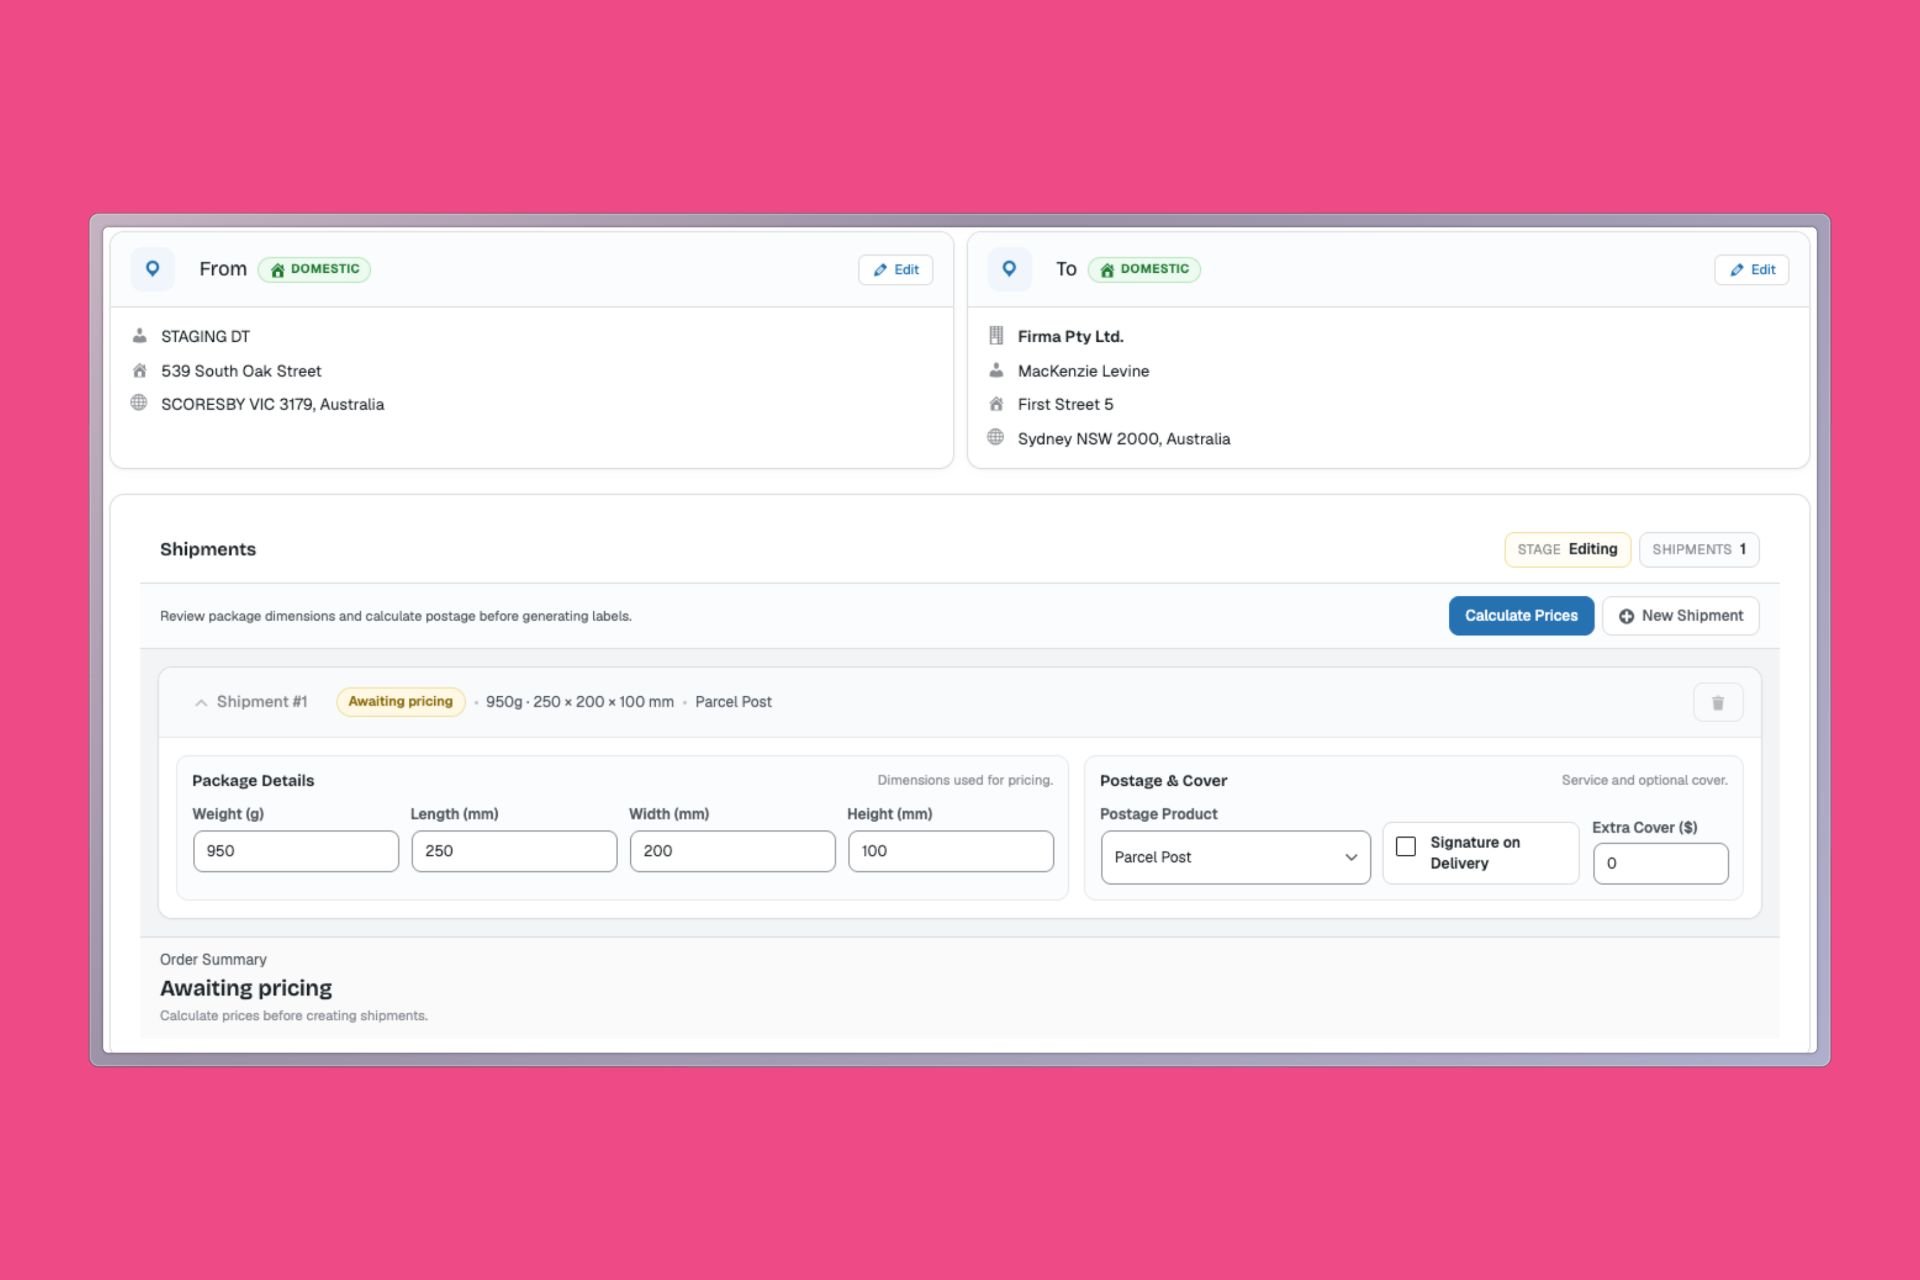
1. Addresses

  • From: Your store address from WooCommerce → Settings → General
  • To: The customer’s shipping address on the order (editable on the order page)

Postcode, city, and state must match. If they don’t, the plugin shows an error.

2. Shipments

For each shipment, enter:

  • Weight, length, width, and height
  • Postage product
  • Optional extras such as Signature on Delivery and Extra Cover

Default weight and package size can be changed in WooCommerce → Australia Post Centre → Settings under Shipping Defaults.

Domestic: package details and postage product are enough.

International: also complete:

  • Duties / Landed Costs (Landed Costs Payer)
  • Customs / Clearance Items (description, weight, quantity, value, country of origin, HS tariff number)

Click New Shipment to add another package, then Calculate Prices.

3. Labels

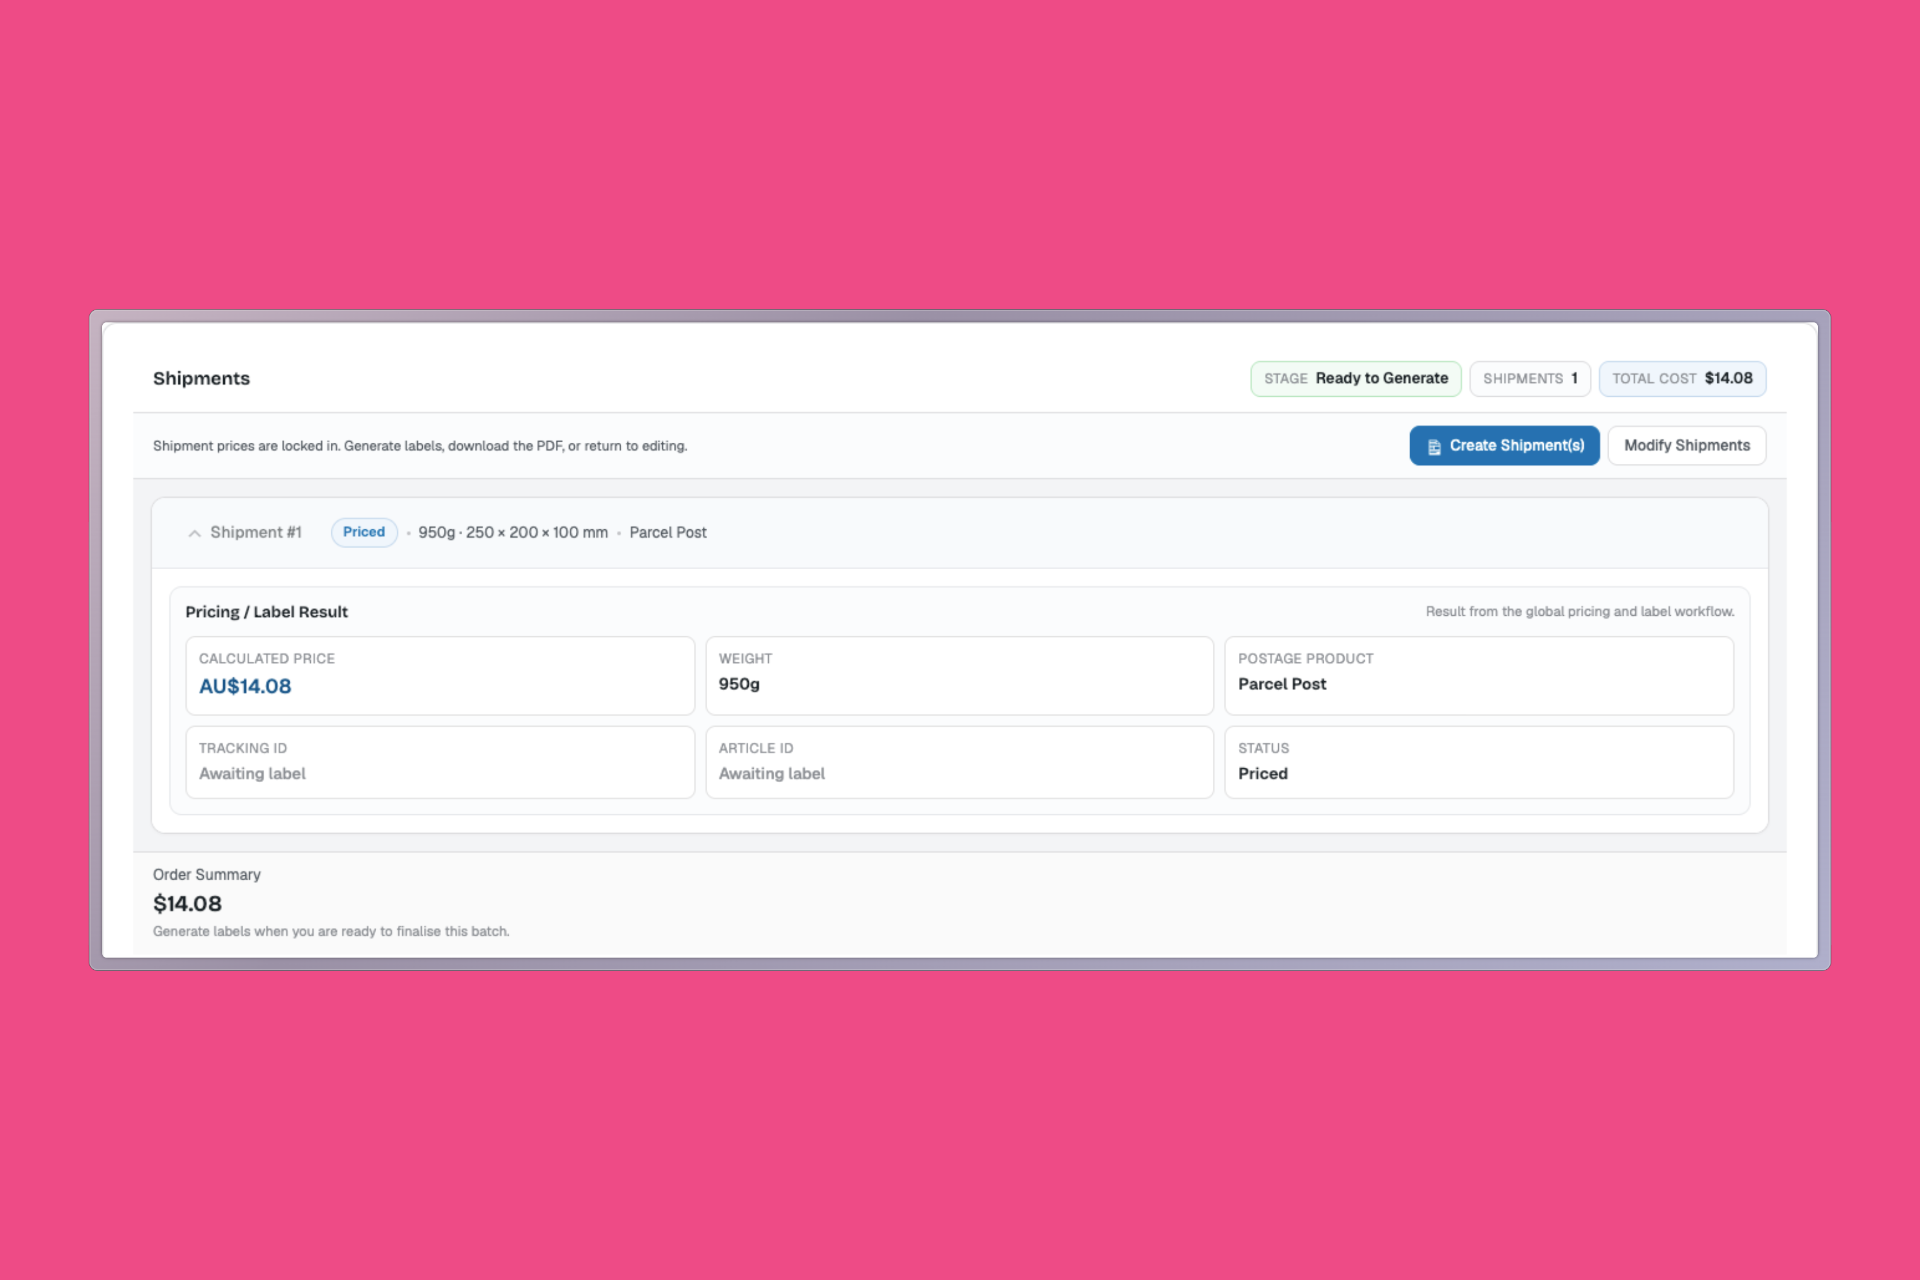
After pricing:

  • Use Modify Shipments if you need to change package details
  • Then continue based on your account type

eParcel

  1. Click Generate Label
    This creates the shipment in your Australia Post account and generates the label.
  2. Click Download Label to open the PDF

MyPost Business

  1. Click Create Shipment(s) to create the shipment in MyPost Business
  2. Click Draft Label (or Open Shipping Orders) to go to Labels Orders
  3. Create/buy the shipping order there, then download the label

Label layout (A4 1–4 per page, or Thermal A6) is set in WooCommerce → Australia Post Centre → Settings under Labels.


4. Shipping Orders (Labels Orders)

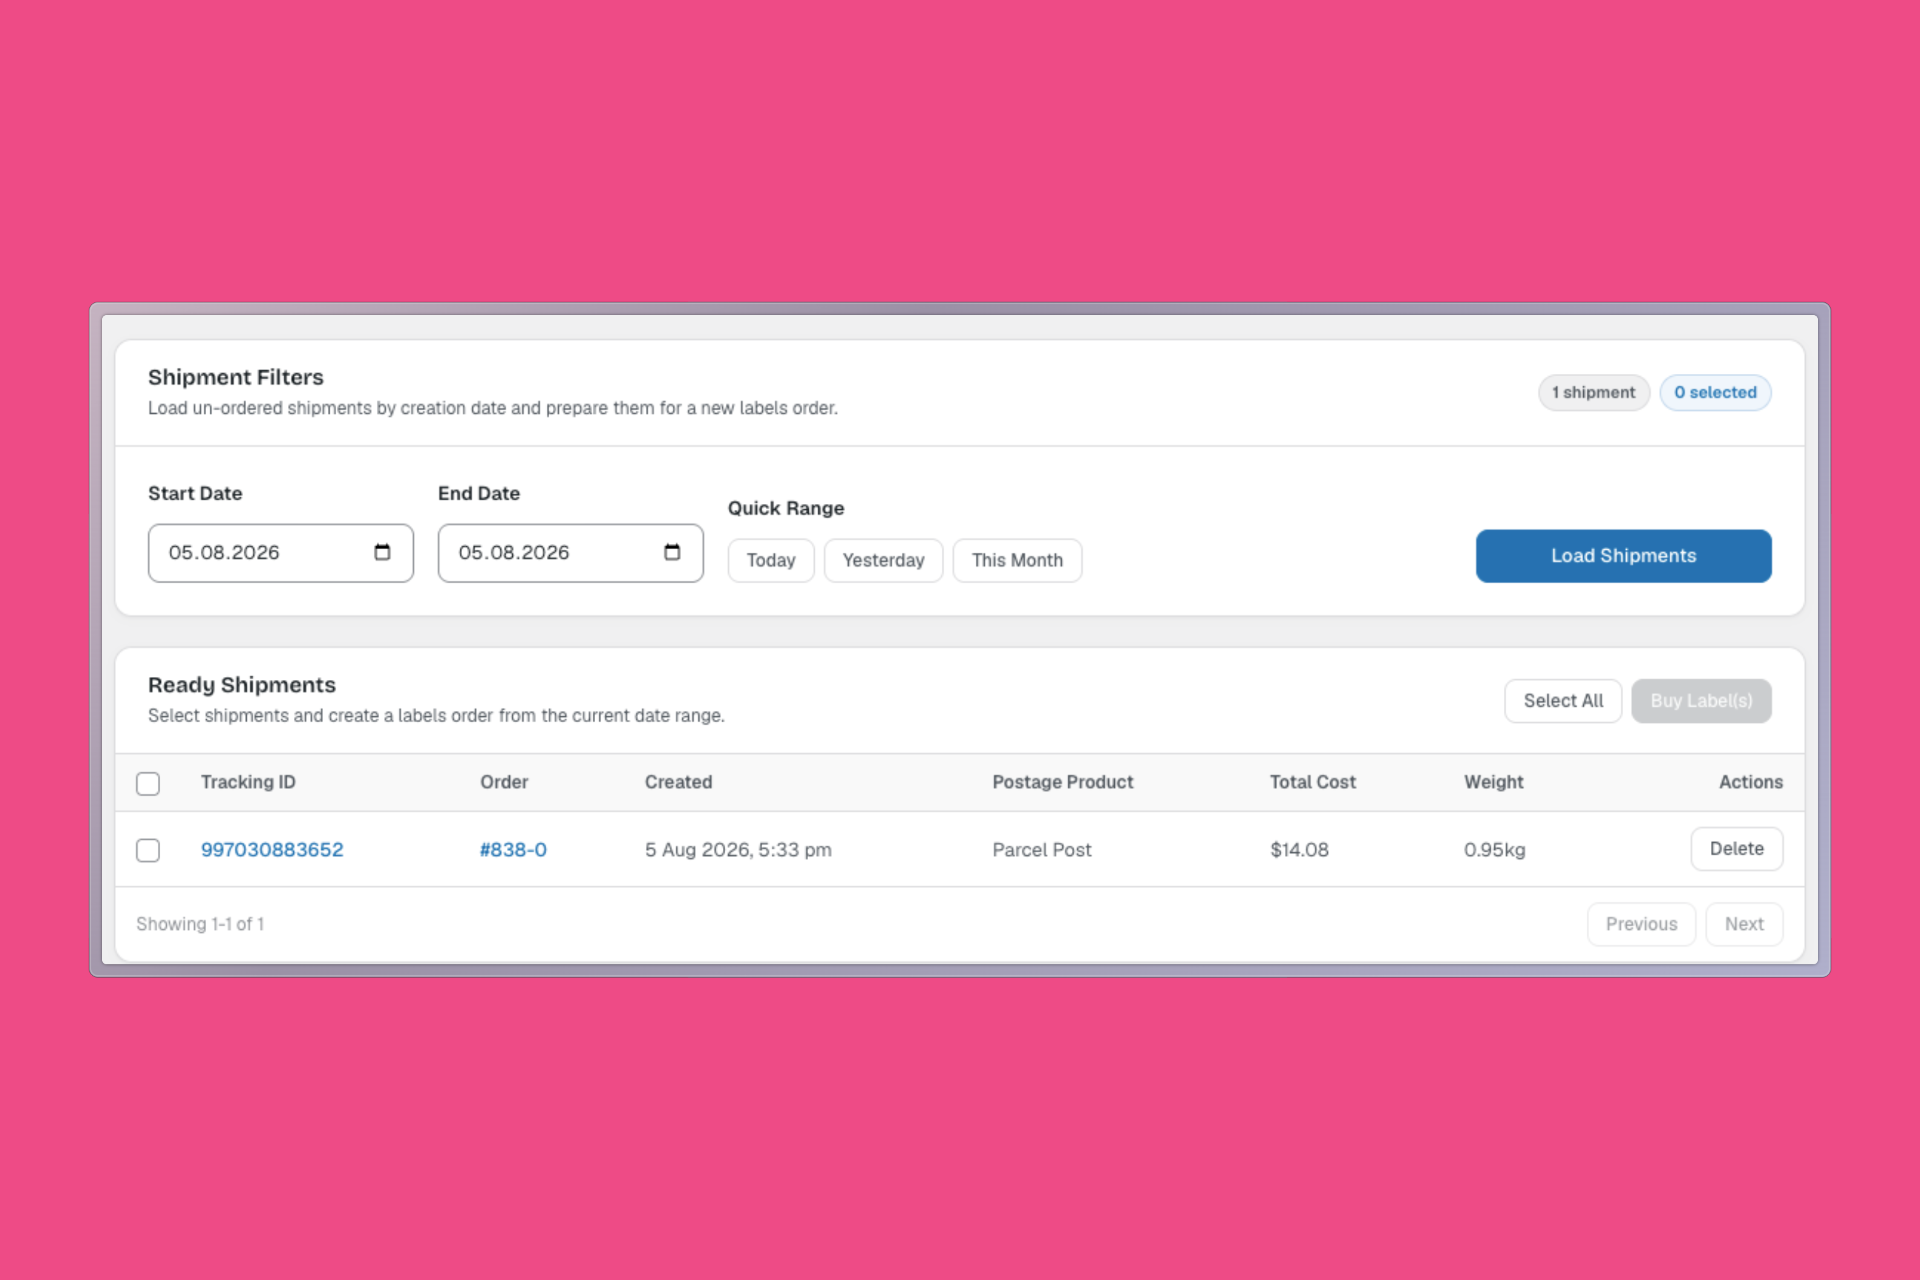
Go to WooCommerce → Australia Post Centre → Labels Orders.

  1. Set a date range (defaults to today; quick options: Today, Yesterday, This Month)
  2. Click Load Shipments
  3. Select the shipments you want
  4. Click:
    • Create Shipping Order (eParcel), or
    • Buy Label(s) (MyPost Business)
  5. Download labels from the created order

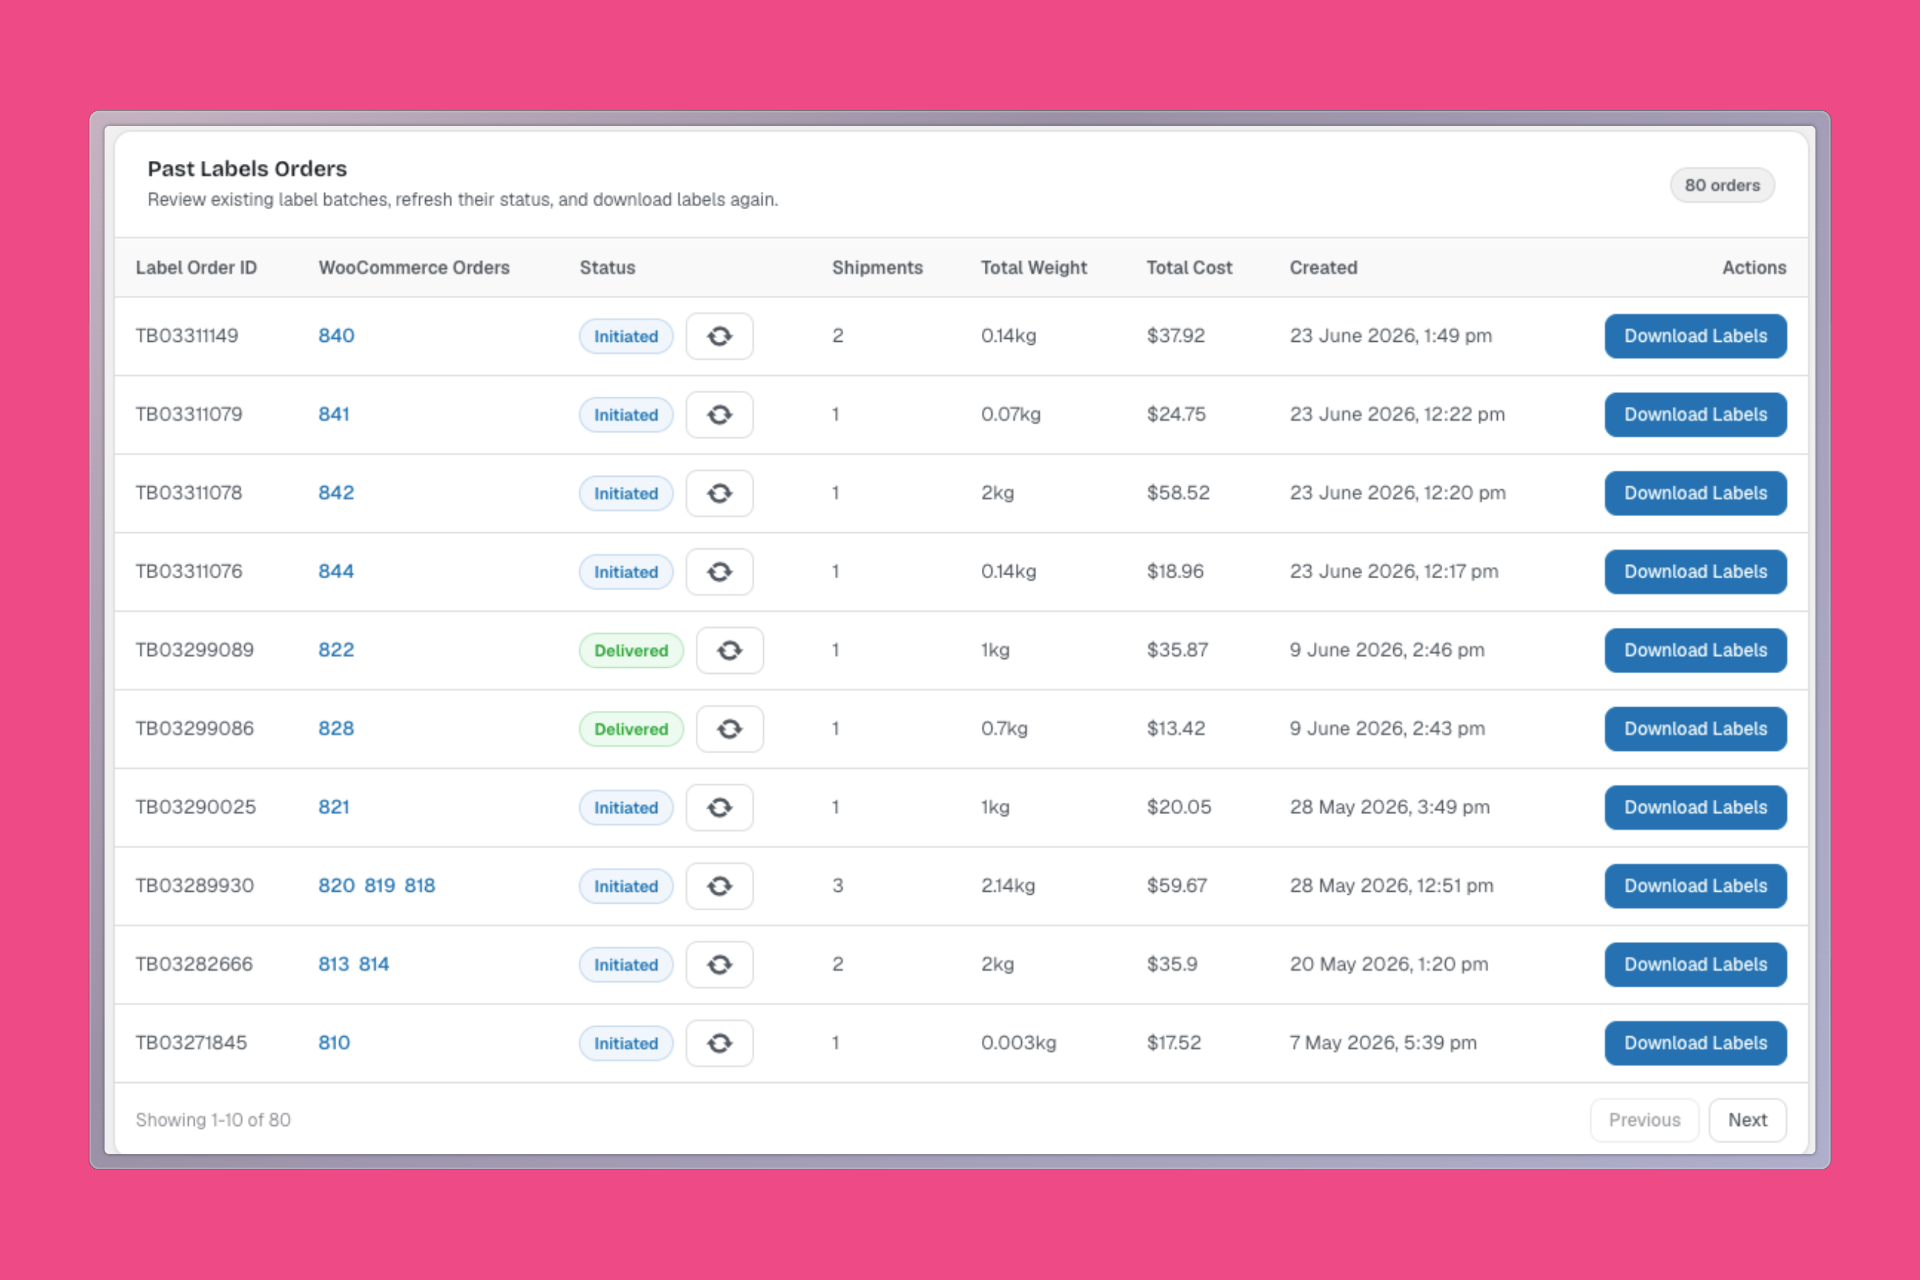
For eParcel, you can also download the Order Summary from past orders on the same page.

MyPost Business accounts can also use Request Pickup from this tab.

Tip: Bulk printing

To print labels for many orders at once, use WooCommerce → Australia Post Centre → Bulk Fulfillment.


Main path updates vs the old article: settings and shipping orders moved to Australia Post Centre; MyPost is Create Shipment(s) → Draft Label → Buy Label(s); eParcel still uses Generate Label directly.


[Labels Pro] How to connect Labels Pro with your eParcel account[Labels Pro] How to Mark a Product as Containing Hazardous Materials?
WPRuby Logo WPRuby

In 2015, WPRuby was established as an independent agency where we focus on producing and supporting many WordPress plugins. Each product we develop is simple to use and easy to customize and backed by awesome support and regular updates.

Resources

  • Knowledge Base
  • Affiliate Area
  • About Us
  • WPTools
  • Nomad Jar

Legal

  • Privacy Policy
  • Terms of Use

Follow us

  • Github
  • X.com
  • LinkedIn
  • Facebook

© 2026 - WPRuby