WooCommerce includes Direct bank transfer (BACS). It shows your account details, the customer places the order, and you wait for the money. That is enough if you only need a title and a block of instructions.
It falls short as soon as you need more than one transfer method, a receipt at checkout, different copy per country, or a payment reference stored on the order. BACS also cannot hide the method from guests, limit it by cart total, or collect a screenshot from the customer’s banking app.
This guide shows you how to add a bank transfer payment gateway to WooCommerce using WooCommerce Custom Payment Gateway Pro. Customers see your bank name, account holder, IBAN, and SWIFT/BIC at checkout. You can collect a transaction ID and a payment receipt, hold the order until the wire arrives, and limit who sees the method.
Why add a bank transfer gateway?
Card processors charge fees and are not available in every market. A WooCommerce bank transfer method is useful when:
- Customers prefer (or must use) a wire transfer, SEPA credit, or local bank deposit
- You want to avoid card fees on large orders
- You sell in countries where bank transfer is the default checkout habit
- You need more than one transfer option (domestic vs international, GBP vs EUR, different legal entities)
- You want the customer to upload a receipt instead of emailing a screenshot later
- You only want bank transfer for certain countries, currencies, or order totals
The plugin does not move money. The customer pays from their bank. The gateway shows the details, collects any extra fields, and sets the order to On hold until you confirm the payment.
Do not use this for card numbers, expiry, or CVV. Use Stripe, PayPal, or WooPayments for cards. Use bank transfer for wires you confirm by hand.
What the checkout should look like
A good bank transfer checkout does three things:
- Names the method clearly — Bank Transfer, Wire Transfer, SEPA Transfer, or the local name customers already use.
- Shows the account they should pay — bank name, account holder, IBAN or account number, SWIFT/BIC, and what to put as the reference.
- Collects what you need to match the payment — a transaction ID, an optional receipt upload, and a short note.
You then choose when they pay:
- Pay after checkout — they get an order number, then transfer using that number as the reference. Leave the receipt field optional.
- Pay before they click Place order — they send the money using their name or email as the reference, upload a screenshot, then place the order. Make the receipt required.
WooCommerce Custom Payment Gateway Pro includes a Bank Transfer / Wire Transfer template that sets this up. You fill in your account details and adjust the copy.
Before you start
You will need:
- A WooCommerce store with WooCommerce Custom Payment Gateway Pro installed and licensed
- The account details customers will use (bank name, account holder, IBAN or account number, SWIFT/BIC)
- A decision on pay-after vs pay-before, and whether a receipt is required
Write the customer-facing copy first: how they pay, what reference to use, and how long you take to confirm.
Step 1: Create the gateway from the Bank Transfer template
- In WordPress, go to WooCommerce → Settings → Custom Payment Gateways.
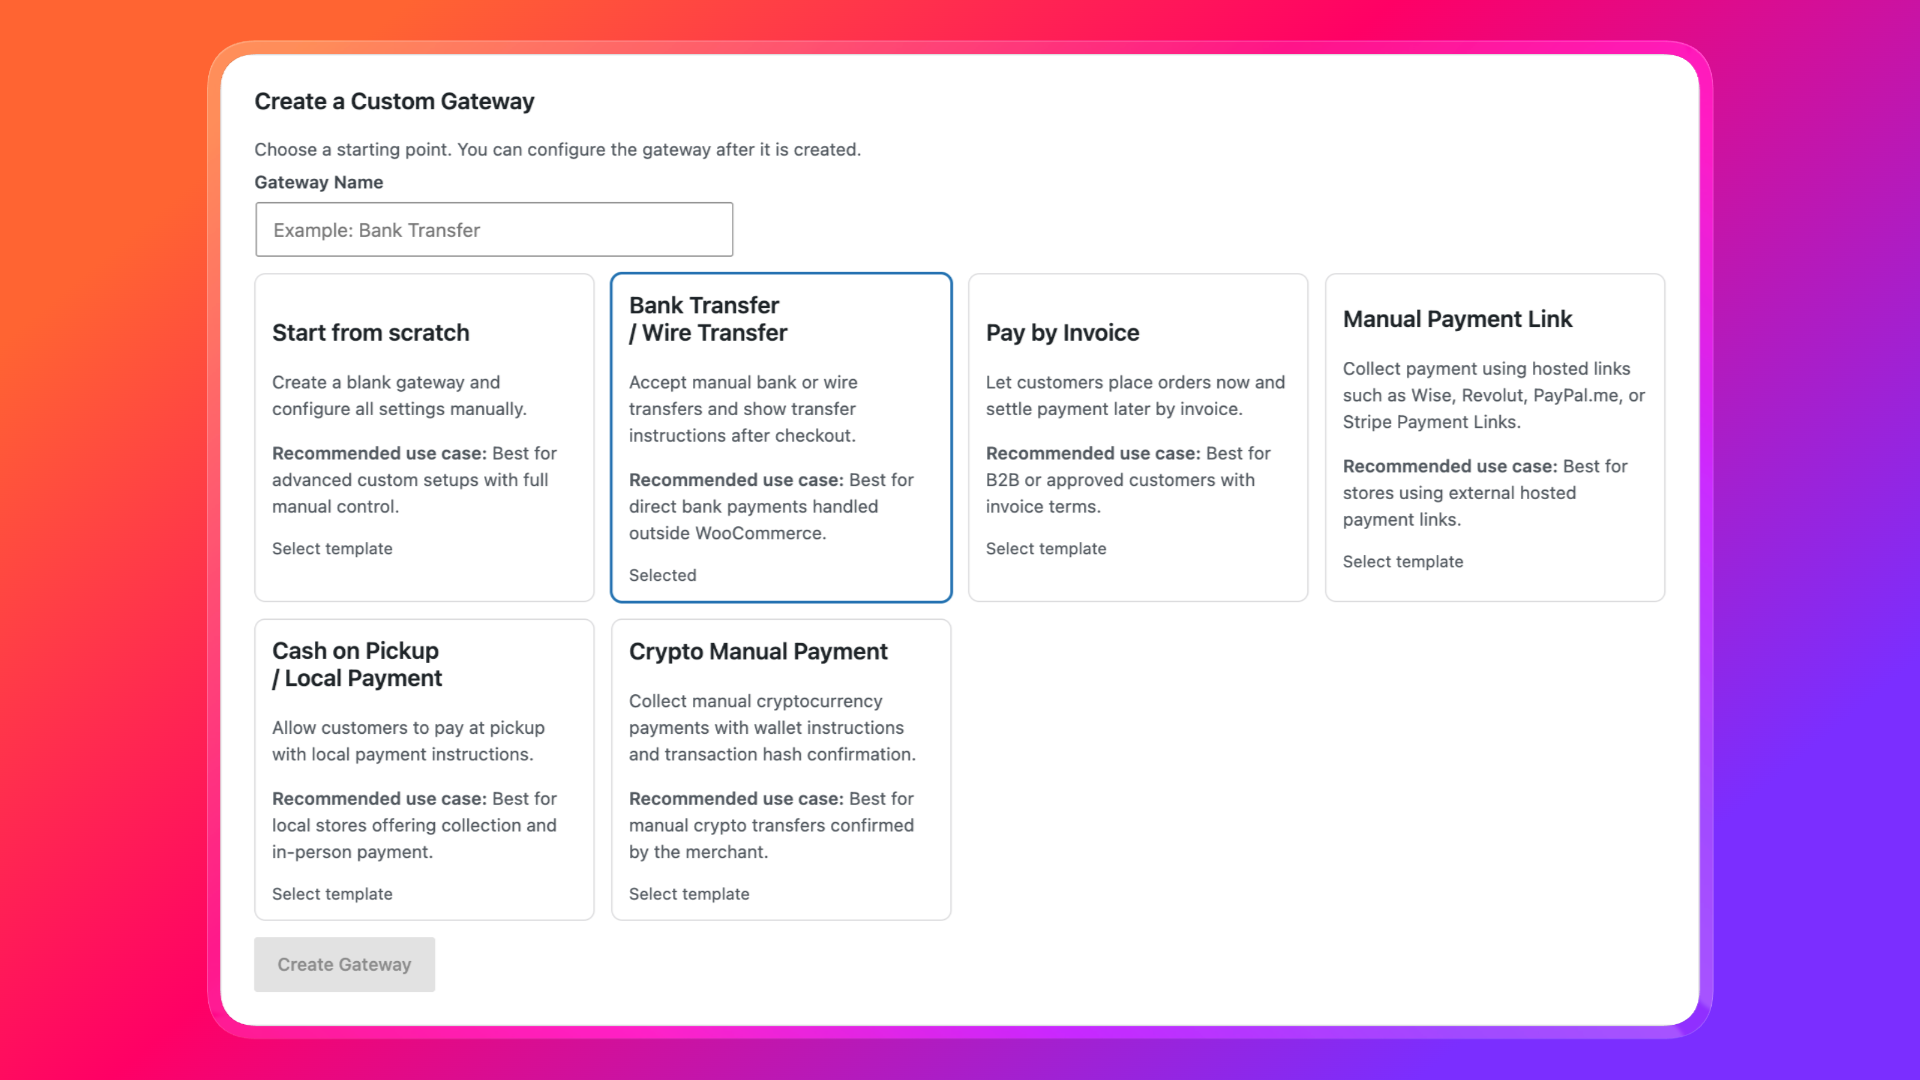
- Under Create gateway, select the Bank Transfer / Wire Transfer template.
- Enter a name such as
Bank Transfer(this is an admin label; you can change the checkout title later). - Create the gateway, then click Configure (or go to WooCommerce → Settings → Payments and click Manage).
The template pre-fills a customer-friendly title, a checkout message, On hold as the order status, payment-detail fields for your bank account, and checkout fields for a payment reference, receipt upload, and optional note.
Step 2: Enable the method and keep it admin-only while you test
On the gateway settings page:
- Check Enable Custom Payment.
- Check Enable Debug Mode.
Debug mode hides the method from customers. Only administrators see it at checkout, so you can test the full flow without offering bank transfer to the store.
Leave debug mode on until you have placed a test order and confirmed the bank details, fields, emails, and order status.
Step 3: Set the title and checkout message
Method Title is the label next to the other payment methods. Use the name your customers already know:
Bank TransferWire TransferSEPA TransferPay by bank deposit
Avoid internal names such as BACS-2 or CPG-1.
Customer Message is shown when they select the method, before they place the order.
For pay-after checkout (order number as the reference):
Pay by bank transfer. Use your order number as the payment reference. We will process the order after the payment has been received.
That is the template default. It matches how WooCommerce BACS works.
For pay-before checkout (receipt at checkout):
Pay using the bank details below, then upload a screenshot or PDF of the transfer. Use your name or order email as the payment reference. We will process the order after we confirm the payment.
Keep this short. IBAN, SWIFT, and bank name belong in payment details, not in this message.
You can also add a Gateway Icon (a full URL to a small bank icon) if you want the method to stand out next to card options.
Step 4: Fill in the bank account customers should pay
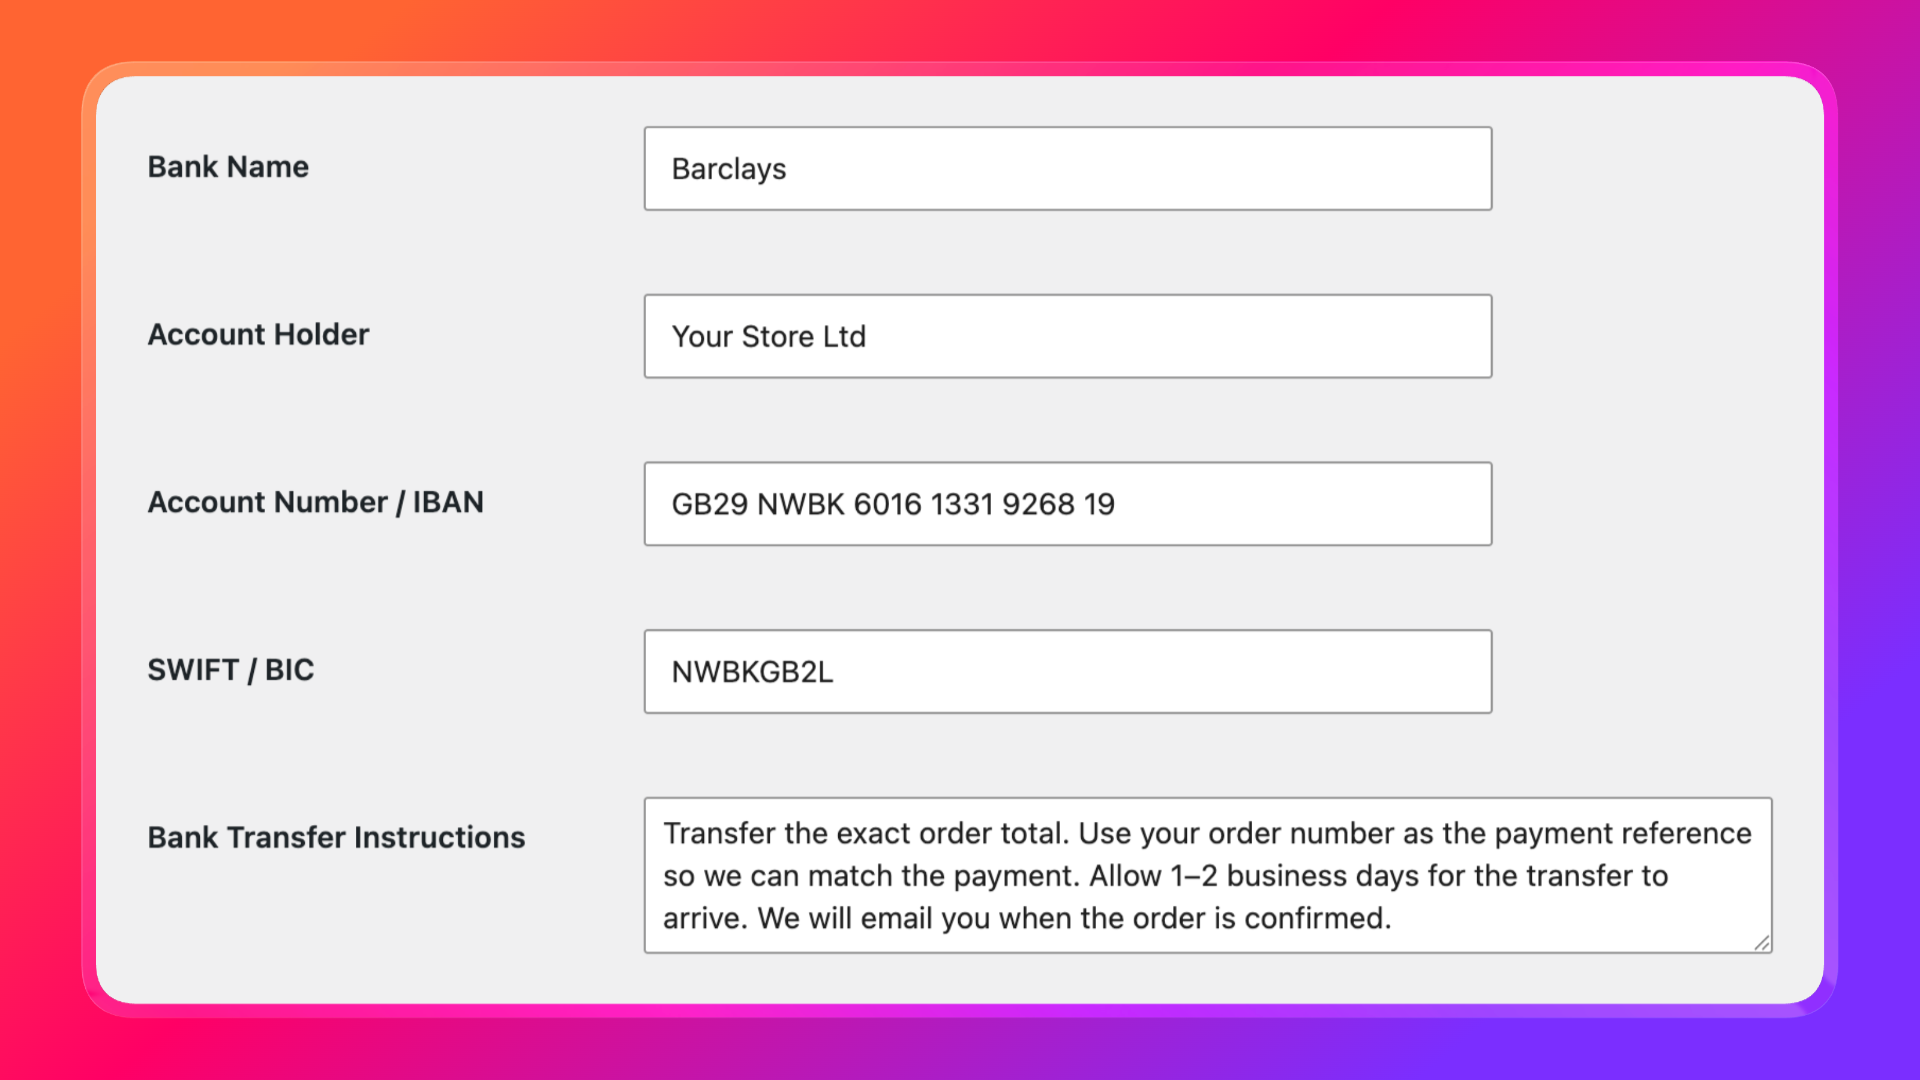
Scroll to Payment details. These fields appear at checkout, on the thank-you page, and in emails (when that option is enabled).
| Setting | What to enter | Example |
|---|---|---|
| Bank Name | The bank that holds the account | Barclays / Deutsche Bank |
| Account Holder | The legal name on the account | Your Store Ltd |
| Account Number / IBAN | IBAN, or local account number | GB29 NWBK 6016 1331 9268 19 |
| SWIFT / BIC | For international wires | NWBKGB2L |
| Bank Transfer Instructions | Extra rules: currency, reference, fees | See examples below |
Pay-after instructions:
Transfer the exact order total. Use your order number as the payment reference so we can match the payment. Allow 1–2 business days for the transfer to arrive. We will email you when the order is confirmed.Pay-before instructions:
Transfer the cart total before you place the order. Use your full name or the email on this order as the reference. Then upload a screenshot or PDF of the transfer below.
Add anything your bank actually needs: “Send in EUR only,” “Payer pays all wire fees,” or “SEPA only — no SWIFT from outside the EEA.” Wrong currency or missing fees is the usual reason a wire does not match.
Do not put API keys or admin-only notes in these fields. Account numbers and IBANs are meant to be public payment destinations.
Step 5: Keep orders on hold until the money arrives
Set Order Status After The Checkout to On hold.
That is the right status for a WooCommerce bank transfer. The order is placed, stock can be held, and nothing is marked paid until you see the money. Pending payment is a reasonable alternative if you treat the order as waiting on the customer rather than waiting on your review.
Avoid Completed. WooCommerce will treat the sale as finished before any wire has arrived.
Step 6: Confirm the checkout fields
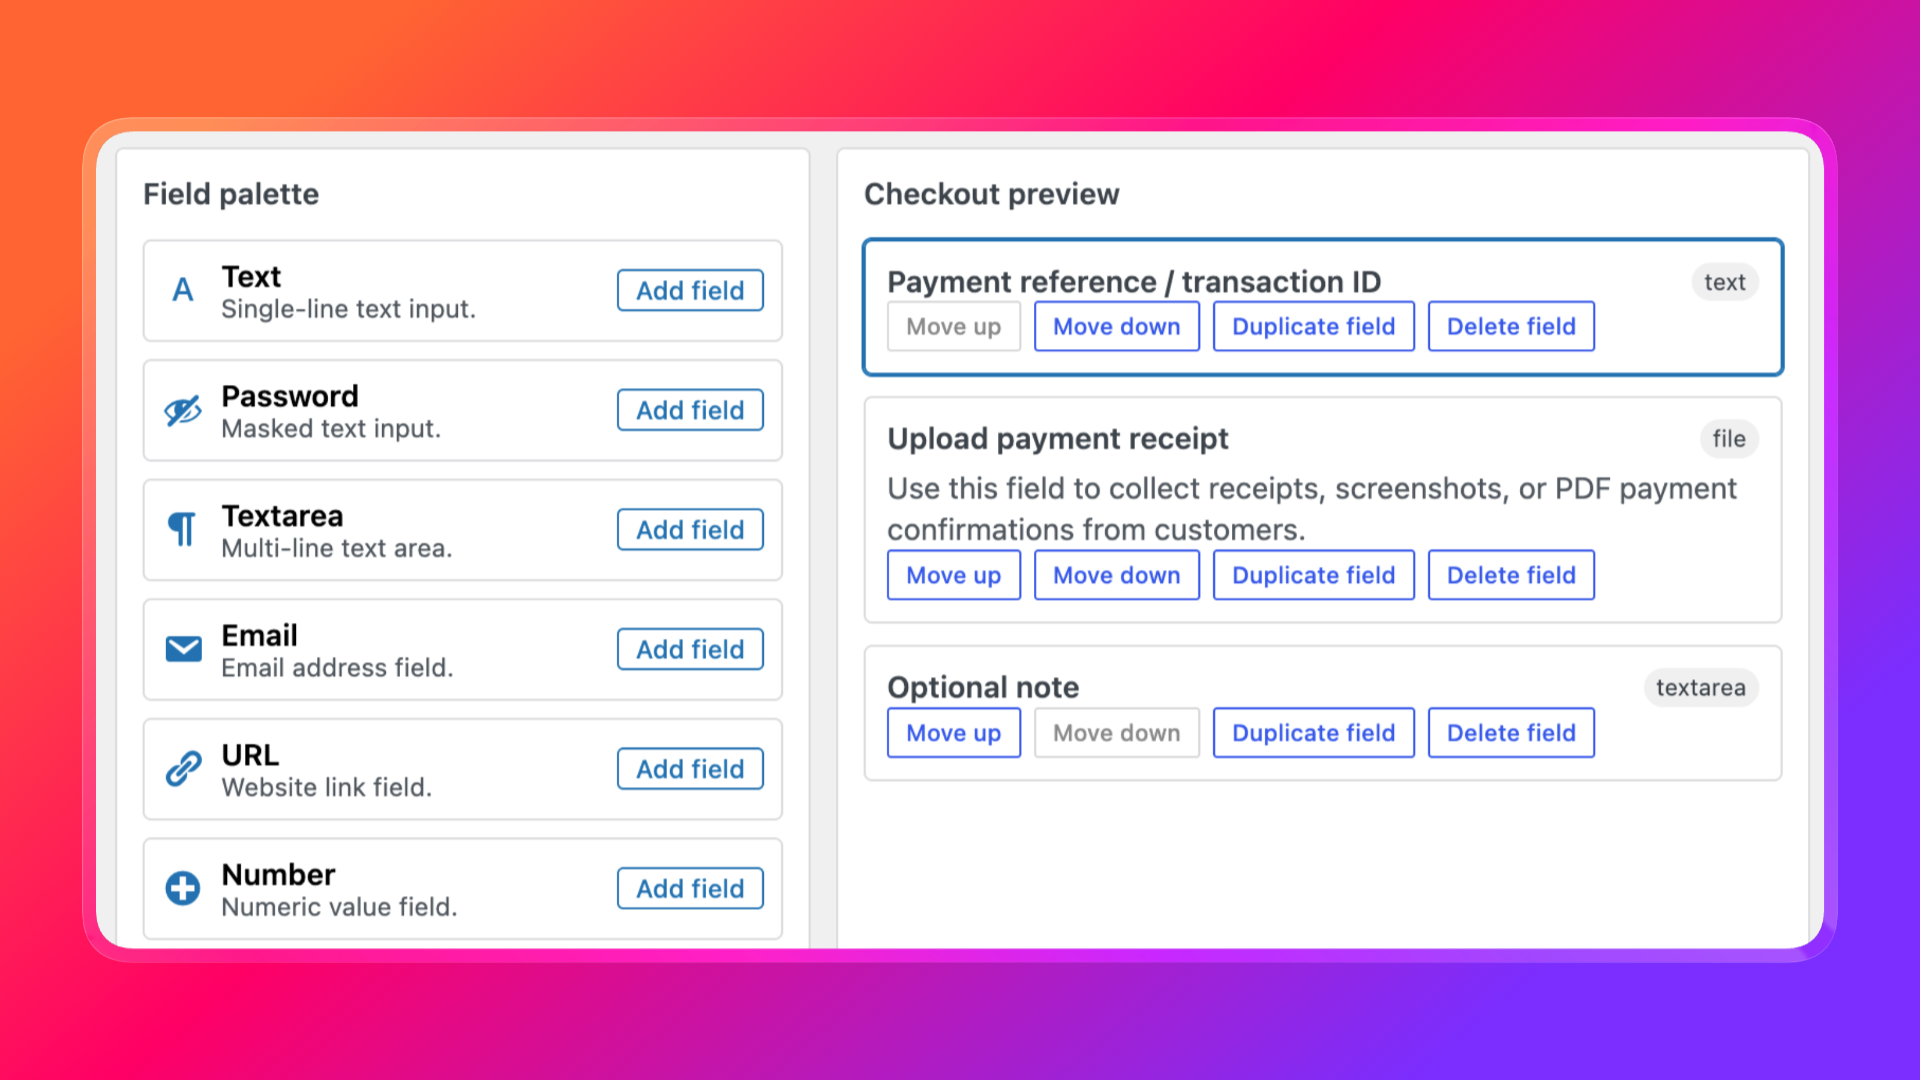
Scroll to Custom Form. The template already includes:
| Field type | Field label | Required | Typical use |
|---|---|---|---|
| Text | Payment reference / transaction ID | No | Bank reference or transaction ID |
| File upload | Upload payment receipt | No | Screenshot or PDF of the transfer |
| Textarea | Optional note | No | Anything you should know when matching the payment |
Adjust labels and help text to match how you talk to customers:
- Payment reference:
The reference shown on your transfer - Upload payment receipt:
Screenshot or PDF of the transfer. JPG, PNG, or PDF, max 5 MB. - Optional note:
Anything we should know when matching the payment
When to make fields required
- Pay-after checkout: leave both optional. The customer does not have a receipt yet. They will use the order number as the reference after they see the thank-you page.
- Pay-before checkout: set Upload payment receipt to required if you will not process the order without a file. You can also require the transaction ID.
Save changes in the field builder when you are done.
Submitted values appear on the order in admin (in the payment information section) so your team does not have to hunt through email for a screenshot.
For a full walkthrough of receipt uploads, see How to upload payment proof in WooCommerce checkout.
Do not add fields for card numbers, expiry, or CVV. The plugin’s old credit-card field is deprecated and cannot be added to new gateways.
Step 7: Add a thank-you note
Customer Note is shown after checkout on the thank-you page and as a customer-visible order note. It is different from the checkout Customer Message.
- Customer Message — how to pay, before they place the order
- Customer Note — what happens next, after they place the order
Pay-after example:
Thank you. Please transfer the order total using the bank details on this page. Use your order number as the payment reference. We will confirm the transfer within 1–2 business days.
WooCommerce order emails already include the order number, so customers still have it if they leave the thank-you page.
Pay-before example:
Thank you. We have your payment details and will confirm the transfer within 1 business day. If we need a clearer screenshot, we will email you. Quote your order number in any reply.
Include a real accounts inbox or store phone so they are not waiting in silence if the wire is missing or the file is unreadable.
Step 8: Show bank transfer only where it belongs (optional)
An enabled gateway appears for everyone unless you add rules. Many stores should not offer a UK IBAN to every country, or a wire option on a £15 cart.
On the gateway settings page:
- Enable Conditional Display Rules.
- Add one or more conditions. All conditions must match for the gateway to show.
Useful setups:
Domestic transfers only
- Condition type: Customer country
- Operator: is
- Value: your country
International wires only
- Condition type: Customer country
- Operator: is not
- Value: your country
Minimum order value (avoid card fees on large carts, or avoid wires on tiny ones)
- Condition type: Cart total
- Operator: greater than
- Value:
200
One currency
- Condition type: Currency
- Operator: is
- Value:
EUR
Logged-in customers only
- Condition type: Logged-in status
- Operator: is logged in
You can combine rules. For example: UK customers with a cart over £200. If the rules do not match, the gateway stays hidden. Cards and other methods still show as usual.
Create a second Bank Transfer gateway if you need two accounts — for example one SEPA IBAN for EU customers and one domestic account for local customers. Give each a clear title and its own country or currency rule.
Step 9: Place a test order
- Confirm Enable Debug Mode is still on.
- Log in as an administrator.
- Add a product to the cart and go to checkout (classic shortcode or block checkout — the plugin supports both).
- Select Bank Transfer.
Check that:
- Bank name, account holder, IBAN, SWIFT/BIC, and instructions appear
- Required fields block checkout when empty
- Optional file uploads accept the types you configured
- The order is created with status On hold
- The payment reference and any uploaded file are stored on the order
- The customer note appears on the thank-you page
If you enabled Add payment info to emails under WooCommerce → Settings → Custom Payment Gateways, confirm the bank details and submitted fields also appear in the order email. Customers who pay after checkout need those details in the email, not only on screen.
When everything looks correct, turn Enable Debug Mode off and save. The method is then available to customers who match your rules (or to everyone, if you did not add rules).
After the order: match the wire, then fulfil
The gateway gets the order into WooCommerce. Your team still confirms the money.
- Open the new On hold order.
- Read the payment reference, note, and any uploaded receipt.
- Match amount, date, and reference against the bank statement.
- If it matches, mark the order Processing or Completed and fulfil as usual.
- If the amount is short (wire fees), the name does not match, or you cannot find the transfer, leave the order on hold and email the customer.
Do not mark the order paid only because a file exists or a reference was typed. Treat those as evidence to check, not as a captured payment.
Custom bank transfer vs WooCommerce BACS
WooCommerce Direct bank transfer (BACS) is enough when you only need one method, a list of account details, and you are happy to match payments later with nothing extra on the order.
Use a custom bank transfer gateway when you need any of the following:
- A receipt or screenshot attached at checkout
- A payment reference stored on the order
- More than one transfer method (domestic vs international, different entities)
- Different titles and instructions per country or currency
- The method limited by country, cart total, currency, or login
- Pay-before instructions (“pay now, then upload proof”) instead of BACS’s pay-after copy
You can run both. Many stores keep cards for retail, BACS for customers who will pay after they have an order number, and a custom bank transfer gateway for wires that need a receipt or country-specific account details.
Bank transfer is also different from Pay by Invoice. Use invoice terms when payment is due after you send an invoice (Net 30, PO numbers, VAT ID). Use bank transfer when the customer is paying your account for this order. See How to add a Pay by Invoice payment method to WooCommerce.
Frequently asked questions
Does WooCommerce already have bank transfer?
Yes. Direct bank transfer (BACS) shows account details and holds the order. Use a custom gateway when you need extra fields, a receipt upload, multiple methods, or visibility rules.
Does this move money automatically?
No. The customer pays from their bank. You confirm the transfer and update the order. The plugin does not process cards or connect to your bank.
Can I show more than one bank account?
Yes. Create additional gateways from the Bank Transfer template — for example one for SEPA and one for domestic transfers — and use conditional display rules so each appears for the right country or currency.
Should customers pay before or after they place the order?
Either works. Pay-after is simpler and matches BACS (use the order number as the reference). Pay-before is faster to confirm if you require a receipt at checkout.
Will this work with the WooCommerce block checkout?
Yes. Test on whichever checkout your theme uses (classic shortcode or blocks) before you turn off debug mode.
Can I use this together with Stripe or PayPal?
Yes. The bank transfer method sits alongside your card gateways. Use conditional rules if only some customers should see it.
Can I disable WooCommerce’s built-in BACS method?
Yes. Go to WooCommerce → Settings → Payments, turn off Direct bank transfer, and use your custom gateway instead so you do not show two bank options.
Get bank transfer on your WooCommerce checkout
If customers already pay you by wire, put that option on checkout with the account details, reference, and receipt fields your team actually uses — instead of stretching BACS or collecting screenshots by email.
WooCommerce Custom Payment Gateway Pro includes a Bank Transfer / Wire Transfer template, a checkout field builder, admin-only debug mode, conditional display rules, and optional API handoff.
Install the plugin, create the gateway from the template, fill in your IBAN and SWIFT, test as an administrator, then turn off debug mode when you are ready for customers to pay by bank transfer.
Need help with a specific bank or multi-currency setup? Contact WPRuby support.