
Introduction
Setting accurate and competitive shipping rates is crucial for any e-commerce business. With the Australia Post WooCommerce Extension PRO, you can provide your customers with reliable shipping options. In this comprehensive guide, we’ll walk you through the step-by-step process of configuring WooCommerce shipping rates using the Australia Post integration, ensuring a smooth and cost-effective shipping experience.
Plugin Installation
To get started, you’ll need to install the Australia Post WooCommerce Extension PRO plugin.
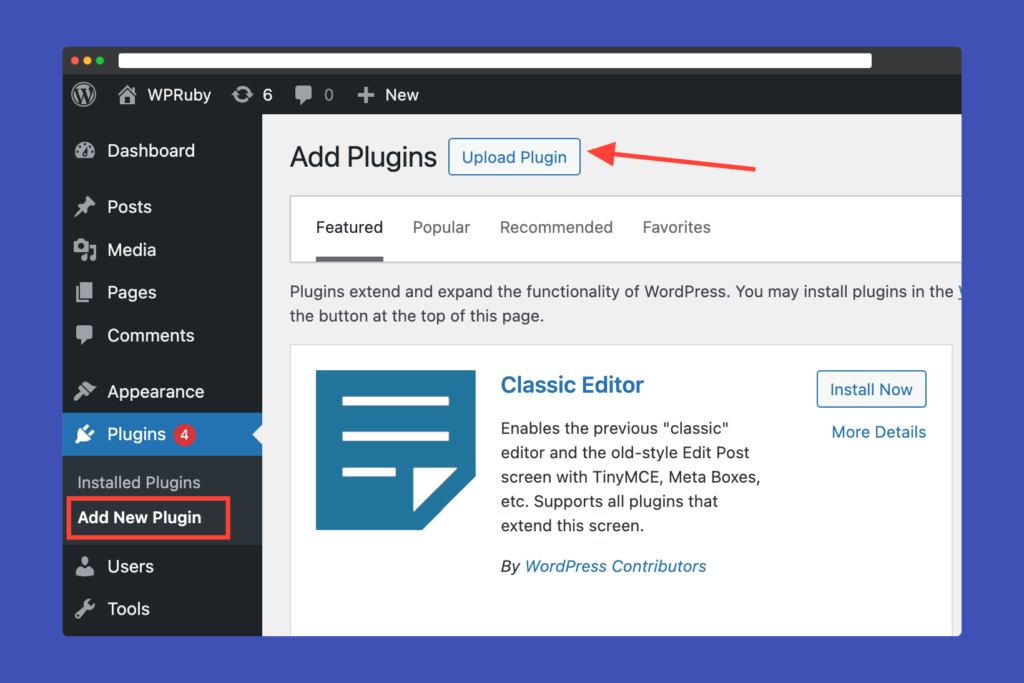
After purchasing the plugin, you can find the plugin files in your WPRuby account or the receipt email which was sent to you after the purchase. Next, you need to go to the WordPress admin area and visit Plugins » Add New page. After that, click on the ‘Upload Plugin’ button at the top of the page.
This will reveal the plugin upload form. Here you need to click on the ‘Choose File’ button and select the plugin file you downloaded earlier to your computer.

After you have selected the file, you need to click on the ‘Install Now’ button.

WordPress will proceed to transfer the plugin file from your computer and complete its installation. Upon successful installation, a confirmation message will be displayed. To begin utilizing the plugin, you must click the “Activate Plugin” button.

Now, the plugin is installed and ready to be configured.
Configuring Shipping Settings in WooCommerce
In the WordPress dashboard navigate to WooCommerce » Settings » Shipping tab. Here, you’ll find various options for configuring shipping zones, methods, and rates. We will assume that you created a shipping zone for Australia. Next, you need to click on the Add shipping method button.

After that, select Australia Post Pro and click on Continue.

Now that you added the Australia Post shipping method to the shipping zone, click on Edit.

Defining Shipping Rates with Australia Post
The plugin now with its default settings will display Australia Post retail rates on the Checkout page for all shipments to Australia. To enable international shipping you just need to repeat the previous step to other shipping zones. Here is an overview of the plugin settings page:

- Method Title Name the shipping method. This will be visible to customers.
- Handling Fees If you charge handling fees, you can add it from here either by adding a fixed number or a percentage (e.g. 2.5 or 2%, you can also add negative values for discounts e.g. -5).
- Fallback Price The plugin will display this price in case the Australia Post service doesn’t return any prices. Please leave it blank to disable the fallback price functionality.

- Domestic Options Australia Post has three options to ship inside Australia, you can enable or disable these options as you want. (This option will appear if the shipping method was assigned to Australia).
- Rates Choose to return all rates (the user will get to choose) or just the cheapest rate.
- Using Australia Post Satchels If you use pre-paid Australia Post satchels, you can enable the satchels you use. (This option will appear if the shipping method was assigned to Australia).

- Weight Only Shipping If you need the plugin to calculate shipping prices only based on weights. Please be cautious as this option might lead to inaccurate shipping prices.
- Delivery Time Enable the display of delivery time for customers.
- Letters Enable this if you ship small products that fit in letter envelopes. The letters standards are given by Australia Post.
- Domestic Letters Options Choose the domestic options of letters that you want to offer to your customers. Please, make sure that you enabled the Letters option for this setting to take effect. (This option will appear if the shipping method was assigned to Australia).

- Domestic Tracked Letters The plugin supports domestic letters with tracking, you can enable each size of the envelopes as well as customize their price. You can also add a priority charge on top of their base price.
- Signature on Delivery If you want to charge the buyer the cost of the (Signature on Delivery) service, you can enable it from this option.
- Extra Cover Adding an extra cover to the shipments. The extra cover is calculated based on the value of the order.
- Separate Extra Services Enabling this option will separate the Extra Cover and Signature on Delivery costs. Users will be able to choose whether they want these extra services or not. For this to work, you also need to enable either Signature on Deliver or Extra Cover or both of them.

- Custom Boxes Use this option if you use your boxes, you can add an unlimited number of boxes. And the plugin will base the shipping price calculations based on the capacity of the boxes you have. Please note that all of the box fields are required.
After customizing the plugin zone settings to your store needs, the plugin is already working and displaying shipping rates to your customers. Now if you want to start printing labels for your orders or you want to display your Australia Post contract rates, see the next sections of this post.
Account Setup with Australia Post
In order to print labels, make sure that you have the Labels Pro version of the plugin. The plugin supports both MyPost Business and eParcel (Parcel Send) accounts.
Settings Up MyPost Business Account
1- Login to your MyPost Business account.
2- From the top-right of the screen click on your name and then click on Business details.

3- From the left sidebar menu click on Platform Partners.
4- Find WPRuby, and then click on the Connect button If you were asked, read and accept the terms and conditions and enter your credit card details.

5- After that, you will be able to see a token generated near WPRuby, click on the Copy Token button.
6- Go back to your WordPress dashboard, then go to WooCommerce » Settings » Shipping » Australia Post Pro.
7- In the Account Type option, select MyPost Business.
8- Paste the token into the Merchant Token field and then click on the Verify button.
9- Click on the Save Changes button.

Settings Up eParcel (Parcel Send) Account
In order to set up the plugin to access your contract rates and start printing labels, you need to obtain the following information: Account Number, API Key, and API Password.
Register for the Shipping and Tracking API
- Register in https://developers.auspost.com.au/register
- And then log in using your registered account at https://developers.auspost.com.au/apis
- At the Shipping and Tracking section, click on Register for a key.
- Complete the registration form using your Australia Post account info.
- Choose Platform Partner as an integration method.
- Select WPRuby from the list, if WPRuby does not exist, choose Other and write WPRuby in the text field. (WPRuby is an official platform partner of Australia Post).

After completing the registration, Australia Post will reply within 24 hours, and if the application is approved, they will send you an email with a PDF file that includes your API credentials information. Check your spam folder if you do not receive an email from Australia Post within 24 hours.
Offering Your Contract Rates To Your Customers
By default, the plugin offers Australia Post retail rates to your customers. To offer your customers your contract rates with Australia Post. You can go to WooCommerce » Settings » Shipping » Australia Post Pro.

Then, enable the Enable Contract Postage option, and click on Save Changes. Please note that if you are using MyPost Business, you do not need to do anything else. The plugin will map your contract shipping products with the enabled shipping services in the shipping zones settings. On the other hand, if you are using eParcel, you will see an option called Enabled Contract Options, you will need to enable your eParcel products as needed.

Printing Labels
Prepare Your Settings
The first step before printing labels using the plugin is to add your correct and valid address in WooCommerce » Settings » General.

Next, you must add your Business Name, Phone Number, and Origin postcode in WooCommerce » Settings » Shipping » Australia Post Pro. Please note that your business phone number is required for printing international shipping labels.

Printing Domestic Shipping Labels (eParcel)
Now, the plugin is fully configured and ready to start printing labels. As soon as you have orders in place, you can just go to the Order page, and navigate to the Australia Post Labels Printer box.
The plugin will automatically fill for you the package dimensions and weight, but you are free to adjust them as you need. After confirming the weight and dimensions, you can select if you need to add Signature on Delivery and Extra Cover services to the shipment. Then you can select which Australia Post service you need to ship the package and then click on Calculate Prices.

After clicking on Calculate Prices, the plugin will display the price of the shipment. If everything is ok, process and click on the Generate Label button. If not, you can click the Modify Shipments button to go back and update the shipment information.

Clicking the Generate Label button will create a shipment in your eParcel account. Moreover, the plugin will attach the tracking number to the WooCommerce order.

Now, you can click the Download Label button to download the label. A new browser window will be opened and you will see the generated label as a PDF file.

MyPost Business Label Printing Flow
For MyPost Business, the label printing is the same except for the following:

After clicking on the Calculate Prices button, you will see a Create Shipments button, this button when clicked will transfer the order information to your MyPost Business account and create the shipments.

At this point, the shipments have been created successfully, now you are ready to draft the labels, and clicking the Draft Label button will redirect you to the Australia Post Labels Orders page.

Now you can select the shipments and click on the Buy Labels(s) button. Alternatively, you can buy the labels with a pickup order where Australia Post will pick up the shipments at your address. Please note that you can do that for many shipments from different WooCommerce orders.

Now the shipping order is created and it is paid for, to download the labels, just click on the Download Labels button.
Printing International Shipping Labels
For printing international shipping, the flow is the same except that you need to include clearance information. Luckily, the plugin will populate the fields for you. You just need to adjust them if needed.

Australia Post Tracking
The tracking number will be generated automatically once you create the label, the tracking number will be included in the customer emails, and their account area.
![]()
You can track the shipment directly from the WooCommerce order page by checking the tracking events and the shipment status.
![]()
Moreover, the tracking number can be found on the Orders page in WooCommerce. When clicked, you will be redirected to the Australia Post tracking website.
Optimization Tips for Seamless Rates
Ship products individually
Sometimes you may want to ship a product by itself since it won’t fit with other items or for any other reason. To do that with our Australia Post plugin, you can just go to the product page, then to the shipping tab and enable the Shipping Individually checkbox. Now, The Australia Post plugin will pack each quantity of the item in its own box.

Hazardous Items
If you are shipping items which can be classified as hazardous, you must declare these items to Australia Post. You can easily mark these items by going to the product page, and in the shipping tab enable the Contains Dangerous Goods checkbox. Now, the product will be declared as containing dangerous materials when you create an Australia Post label.

Make Extra Cover and Signature on Delivery Optional
If you want to charge your customers the fees of shipping insurance or signature on delivery, you can just enable these options from the plugin settings page. However, if you want your customers to be free to choose whether they want to pay for these extra services, you can just enable the Separate Extra Services option on the plugin settings page.

As you can see below, the customer can choose the service they need at checkout.

Weight Only Shipping
To offer extra flexibility to the plugin, the plugin can only consider weight when calculating the shipping. That means the dimensions of the items will be ignored. This can be useful when the dimensions of your items are irregular, ignoring the dimensions will lead to better shipping rates. You can enable the Weight Only shipping from the plugin’s settings page.

Conclusion
In conclusion, the journey of developing our plugin over the last 8 years has been both challenging and rewarding. The process has not only allowed us to refine and enhance its capabilities continuously but also to envision a roadmap brimming with potential innovations. Our commitment remains unwavering as we look ahead, with numerous features and enhancements planned. This forward-thinking approach ensures that we not only meet the evolving needs of our users but also anticipate future demands, setting new standards in our field. Stay tuned, as the best is yet to come.