If you sell to businesses, “Pay now with a card” is often the wrong checkout. Wholesale buyers, agencies, schools, and government accounts usually need to place the order first and settle it later against an invoice — often with a purchase order number, a VAT or tax ID, and payment terms such as Net 30.
WooCommerce does not include a dedicated invoice gateway. Direct bank transfer and cheque payments are close, but they are not built for trade credit: they do not collect company and PO details, they do not show your invoice terms, and they cannot be limited to approved wholesale customers.
This guide shows you how to add a Pay by Invoice method to WooCommerce using WooCommerce Custom Payment Gateway Pro. Customers complete checkout without paying online. You review the order, send the invoice, and mark it paid when the money arrives.
Why add Pay by Invoice?
Card gateways are built for immediate payment. Invoice terms are built for trust and accounting.
A Pay by Invoice method is useful when:
- You sell B2B and already invoice customers outside the store
- Buyers must quote a purchase order number on every order
- You offer Net 15 / Net 30 / Net 45 (or similar) payment terms
- You only want approved or logged-in wholesale customers to use this option
- You need company name, VAT/tax ID, and a billing contact email at checkout
Without a dedicated method, those customers either abandon checkout or email you an order. A proper invoice gateway keeps the order inside WooCommerce, collects the details your accounts team needs, and sets the order to On hold until you send the invoice and receive payment.
What the checkout should look like
A good invoice checkout does three things:
- Explains the process — the customer is not paying now; you will send an invoice after review.
- Shows your terms — invoice instructions, payment deadline, and an accounts contact.
- Collects B2B details — company name, VAT/tax ID, purchase order number, and billing contact email.
WooCommerce Custom Payment Gateway Pro includes a Pay by Invoice template that sets this up for you. You can then adjust the wording, fields, and who sees the method.
Before you start
You will need:
- A WooCommerce store with WooCommerce Custom Payment Gateway Pro installed and licensed
- Your invoice process written down: who sends invoices, typical payment terms, and the accounts email address
- (Optional) a wholesale user role if you only want approved customers to see the method
The plugin does not process card payments or create PDF invoices by itself. It adds the checkout method, collects the extra fields, and holds the order so your accounts workflow can take over. You can still use a PDF invoices plugin, accounting software, or an invoicing API alongside it.
Step 1: Create the gateway from the Pay by Invoice template
- In WordPress, go to WooCommerce → Settings → Custom Payment Gateways.
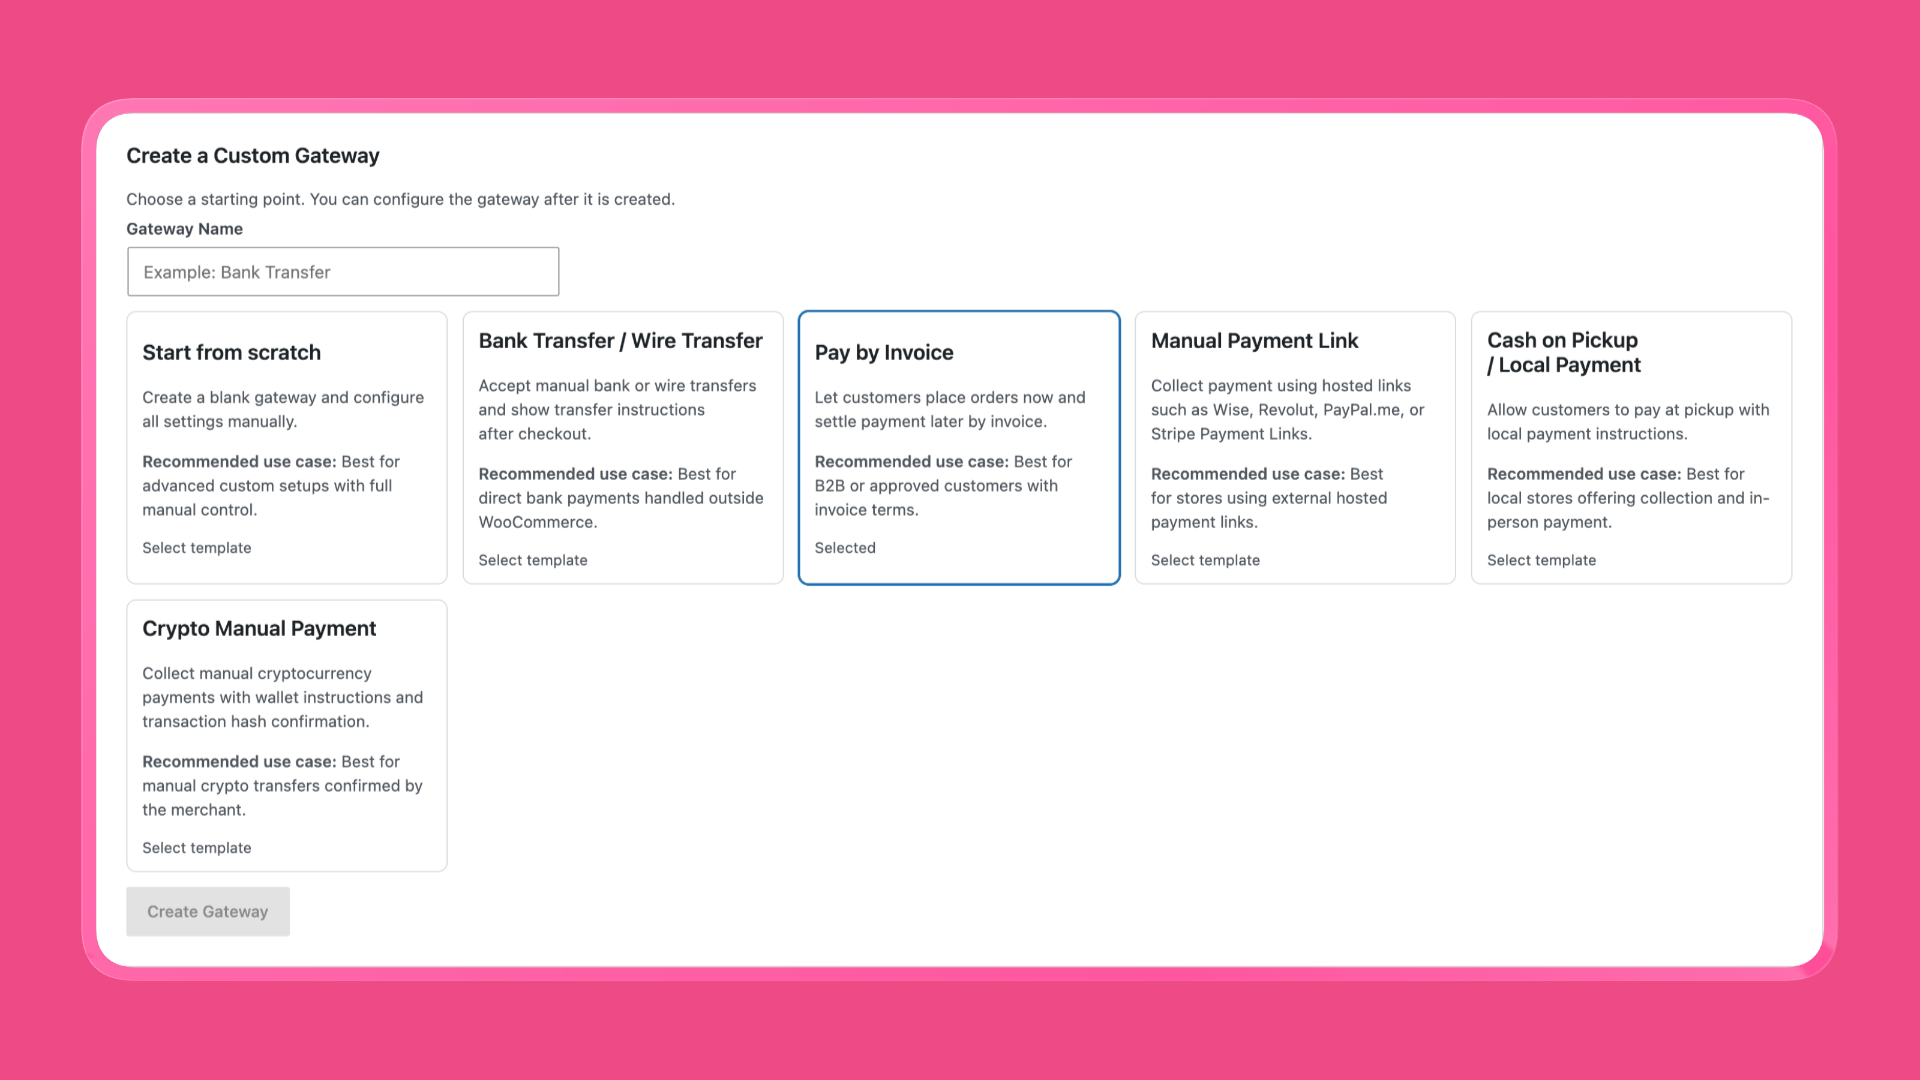
- Under Create gateway, select the Pay by Invoice template.
- Enter a name such as
Pay by Invoice. - Create the gateway, then click Configure (or go to WooCommerce → Settings → Payments and click Manage).
The template pre-fills a customer-friendly title, a checkout message, On hold as the order status, and checkout fields for company name, VAT/tax ID, purchase order number, and billing contact email.
Step 2: Enable the method and keep it admin-only while you test
On the gateway settings page:
- Check Enable Custom Payment.
- Check Enable Debug Mode.
Debug mode is important. While it is on, only administrators see the gateway at checkout. You can test the full flow without offering invoice terms to every visitor.
Leave debug mode on until you have placed a test order and confirmed the fields, emails, and order status.
Step 3: Set the title, message, and payment details
These are the texts customers read at checkout. Keep them specific to your process.
Method Title: Pay by Invoice
That is the label next to the other payment methods.
Customer Message (shown when the method is selected):
Place your order now and pay later by invoice. We will send the invoice and payment instructions after reviewing your order.
The Pay by Invoice template also has three payment-detail fields. These appear in the Payment details section at checkout, on the thank-you page, and in emails (when that option is enabled):
Invoice Instructions
After your order is approved, we will email a PDF invoice to your billing contact. Please reference your order number on all payments and correspondence.
Payment Terms
Net 30 days from invoice date
Change this to match your business (Net 15, Net 45, Due on receipt, and so on).
Invoice Contact Email
[email protected]
Use a real accounts or finance inbox. Customers can click it from the payment details.
You can also add a Gateway Icon (a full URL to a small invoice icon) if you want the method to stand out next to card options.
Step 4: Keep orders on hold until you get paid
Set Order Status After The Checkout to On hold.
That is the right status for invoice terms. The order is placed, stock can be held, and nothing is marked paid until you confirm the invoice has been settled. Pending payment is a reasonable alternative if you treat the order as waiting on the customer rather than waiting on your review.
Avoid Completed for invoice checkouts. WooCommerce will treat the order as finished before any money has arrived.
Step 5: Confirm the B2B checkout fields
Scroll to Custom Form. The template already includes:
| Field type | Field label | Required | Typical use |
|---|---|---|---|
| Text | Company name | No | Legal business name |
| Text | VAT / Tax ID | No | Tax or VAT registration number |
| Text | Purchase order number | No | Customer’s internal PO reference |
| Billing contact email | Yes | Where you send the invoice |
Adjust labels and help text to match how you talk to customers. Useful help text:
- Company name:
Enter your registered company name - VAT / Tax ID:
Your tax or VAT registration number - Purchase order number:
Your internal PO reference - Billing contact email:
We will send the invoice to this address
If every wholesale order must include a PO, set Purchase order number to required. If you only sell to VAT-registered businesses, make VAT / Tax ID required as well.
You can add more fields from the field builder if your process needs them — for example a file upload for a purchase-order PDF, or a select field for invoice delivery (email vs post). Save changes in the field builder when you are done.
Submitted values appear on the order in admin (in the payment information section) so your accounts team does not have to chase the customer for a PO number later.
Step 6: Add a thank-you note
Customer Note is shown after checkout on the thank-you page and as a customer-visible order note. Use it to set expectations:
Thank you for your order. Our accounts team will review your order and send an invoice within 2 business days. If you have questions, contact [email protected].
This is different from the checkout Customer Message. The message explains the method before they place the order. The note tells them what happens after.
Step 7: Show Pay by Invoice only to the right customers
Most stores should not offer invoice terms to every guest. Use Conditional Display Rules so the method appears only when it should.
On the gateway settings page:
- Enable Conditional Display Rules.
- Add one or more conditions. All conditions must match for the gateway to show.
Common setups:
Wholesale customers only
- Condition type: User role
- Operator: is
- Value: your wholesale role
Logged-in customers only
- Condition type: Logged-in status
- Operator: is logged in
Domestic invoices only
- Condition type: Customer country
- Operator: is
- Value: your country
Minimum order value
- Condition type: Cart total
- Operator: greater than
- Value:
500(or whatever threshold you use)
You can combine rules. For example: logged-in wholesale customers in the United Kingdom with a cart over £500. If the rules do not match, the gateway stays hidden and shoppers still see your card and other methods.
Step 8: Place a test order
- Confirm Enable Debug Mode is still on.
- Log in as an administrator.
- Add a product to the cart and go to checkout (classic or block checkout — the plugin supports both).
- Select Pay by Invoice.
Check that:
- The customer message and payment details appear
- Required fields block checkout when empty
- The order is created with status On hold
- Company, VAT, PO, and billing email are stored on the order
- The customer note appears on the thank-you page
If you enabled email payment info under WooCommerce → Settings → Custom Payment Gateways, confirm the submitted fields also appear in the order email.
When everything looks correct, turn Enable Debug Mode off and save. The method is then available to customers who match your rules.
Optional: send the order to your invoicing tool
If you already create invoices in another system (accounting software, a custom API, or a webhook into Zapier or Make), you do not have to copy orders by hand.
On the same gateway, open Advanced options and enable API requests. You can POST the order ID, total, billing email, and your custom field values (company name, PO number, and so on) to an invoicing endpoint after checkout.
Use Send Test Request and the API Logs on that settings page before you rely on it in production. The plugin is a checkout and data-handoff tool here — your invoicing system still generates the actual invoice.
For field mapping and headers, see the plugin’s API requests documentation.
After the order: a simple accounts workflow
The plugin gets the order into WooCommerce in the right state. Your team still needs a clear process after that:
- Review the On hold order and the submitted company / PO details.
- Send the invoice (PDF plugin, accounting software, or your API).
- When payment arrives, mark the order Processing or Completed in WooCommerce.
- Fulfil as usual.
If an order should not be invoiced — credit check failed, missing PO, wrong entity — leave it on hold or cancel it and email the billing contact. The checkout method does not replace that judgement; it just stops the sale from falling out of the store.
Pay by Invoice vs bank transfer vs cheque
WooCommerce ships with Direct bank transfer and Check payments. Use those when the customer is paying immediately by wire or cheque and you only need to show account details.
Use Pay by Invoice when:
- Payment is due after you invoice, not at checkout
- You need PO numbers, tax IDs, and a billing contact
- Only some customers are allowed to use trade credit
- You may later send the same order data to an invoicing API
You can run both. Many stores keep cards for retail, bank transfer for one-off wires, and Pay by Invoice for approved wholesale accounts.
Frequently asked questions
Does this charge the customer at checkout?
No. The customer places the order. You invoice them afterwards. The plugin does not process cards or collect card numbers — and you should not add fields for full card data.
Can I create more than one invoice-style method?
Yes. Create additional gateways from a template or from scratch. For example, one method for Net 30 wholesale and another for “request a quote / we will invoice” on large carts.
Will this work with the WooCommerce block checkout?
Yes. Test on whichever checkout your theme uses (classic shortcode or blocks) before you turn off debug mode.
Can I use this with WooCommerce PDF Invoices?
Yes. The order still exists in WooCommerce, so PDF invoice plugins can generate documents as they normally would. Custom Payment Gateway Pro can also attach the payment information it collected to invoices from the PDF Invoices & Packing Slips plugin.
What if I only want this for some products?
Use a Product categories or Products condition so the gateway appears only when the cart contains those items.
Get Pay by Invoice on your store
If you need customers to order now and pay later — with company details, purchase orders, and clear terms — add a dedicated Pay by Invoice gateway instead of stretching bank transfer or cheque payments to fit.
WooCommerce Custom Payment Gateway Pro includes a Pay by Invoice template, a checkout field builder, debug-only testing, and optional API handoff to your invoicing tools.
Install the plugin, create the gateway from the template, test as an administrator, then turn off debug mode when you are ready to offer invoice terms to the right customers.
Need help with a specific accounts workflow? Contact WPRuby support.