If you run an Australian WooCommerce store, you already know the pain: orders land in WordPress, then staff re-type names, addresses, and weights into MyPost Business or eParcel just to print a label.
This guide walks through the full Labels Pro (v7) workflow — from connecting your Australia Post account, to printing a single order label, to bulk-printing a day’s worth of labels in one PDF — without leaving WooCommerce.
Print Australia Post labels directly from WooCommerce → Get Labels Pro
What you need before you start
Label printing is a Labels Pro feature. You will need:
- WooCommerce with products that have weight (and dimensions where required)
- An Australia Post business account — either MyPost Business or eParcel
- WPRuby Australia Post Labels Pro installed and licensed
- A printer that can handle A4 (1–4 labels per page) or thermal A6 labels
Pro (rates-only) lets customers see live Australia Post prices at checkout. Labels Pro adds the printer, bulk fulfilment, shipping orders, and tracking written back to the order.
Step 1: Connect Australia Post in Australia Post Centre
Everything for labels lives under WooCommerce → Australia Post Centre.
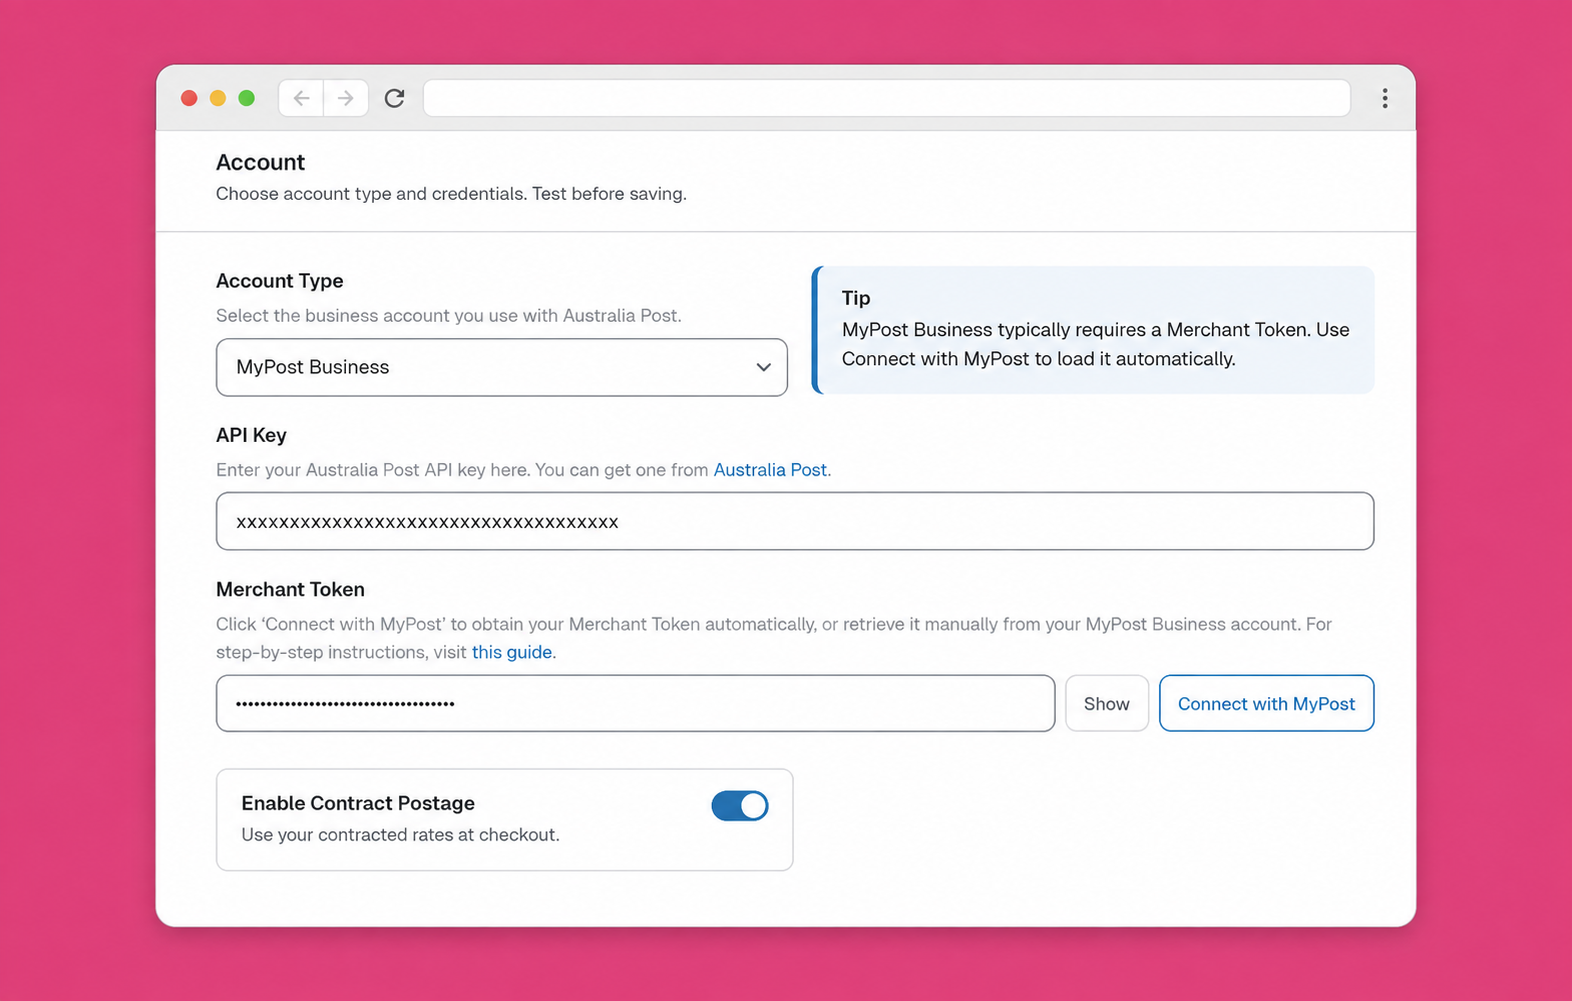
Choose your account type
- Open Australia Post Centre → Settings
- Under account settings, choose:
- MyPost Business — typical for SMBs
- eParcel — contract / Parcel Send accounts
- Connect credentials:
| Account | How to connect |
|---|---|
| MyPost Business | Click Connect with MyPost, grant access, and the merchant token is loaded automatically (or paste a token and verify) |
| eParcel | Enter account number, API key, and API password, then Verify |
- Set your business name and business phone (phone is required for international labels)
- Choose a label layout (A4-1pp, A4-2pp, A4-3pp, A4-4pp, or thermal A6) and whether labels are branded
- Save settings
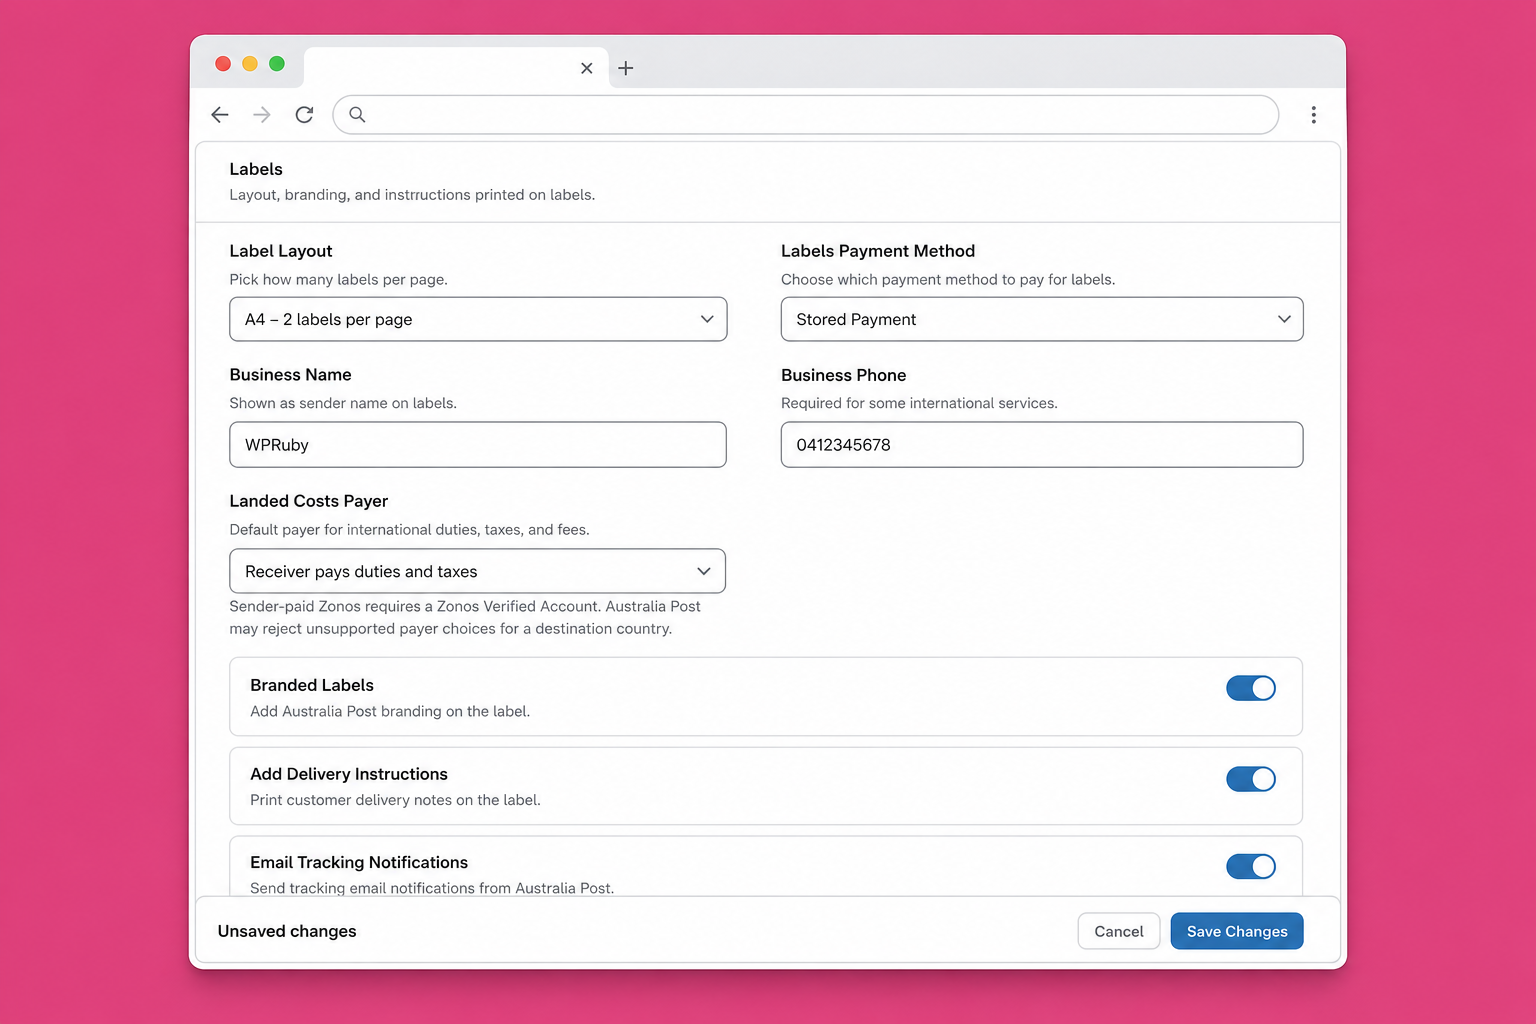
You can print labels with either account type. Contract postage at checkout is optional — turn it on only if you want discounted contract rates to appear at cart/checkout.
Step 2: Print a label from a single WooCommerce order
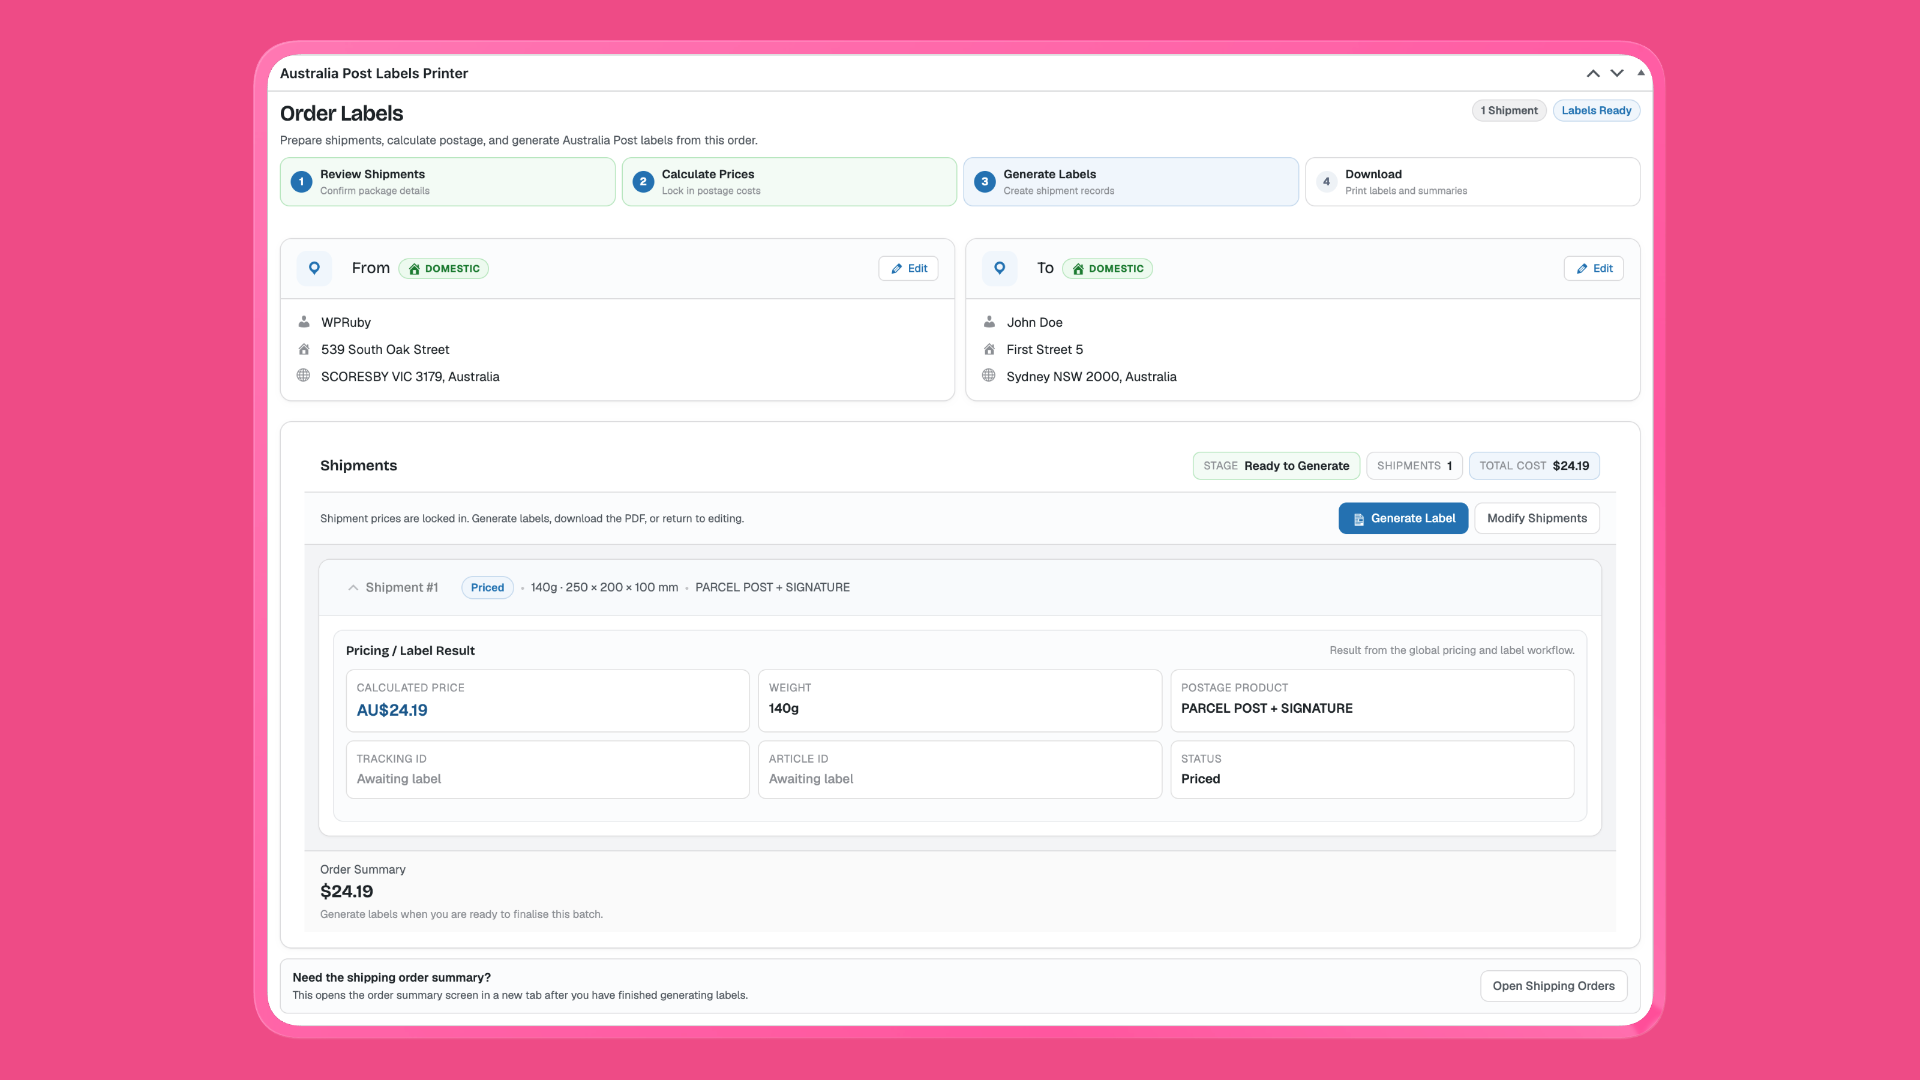
For one-off fulfilment, use the Order Labels printer on the order edit screen.
Open the Labels Printer
- Go to WooCommerce → Orders
- Open a processing (or on-hold) order
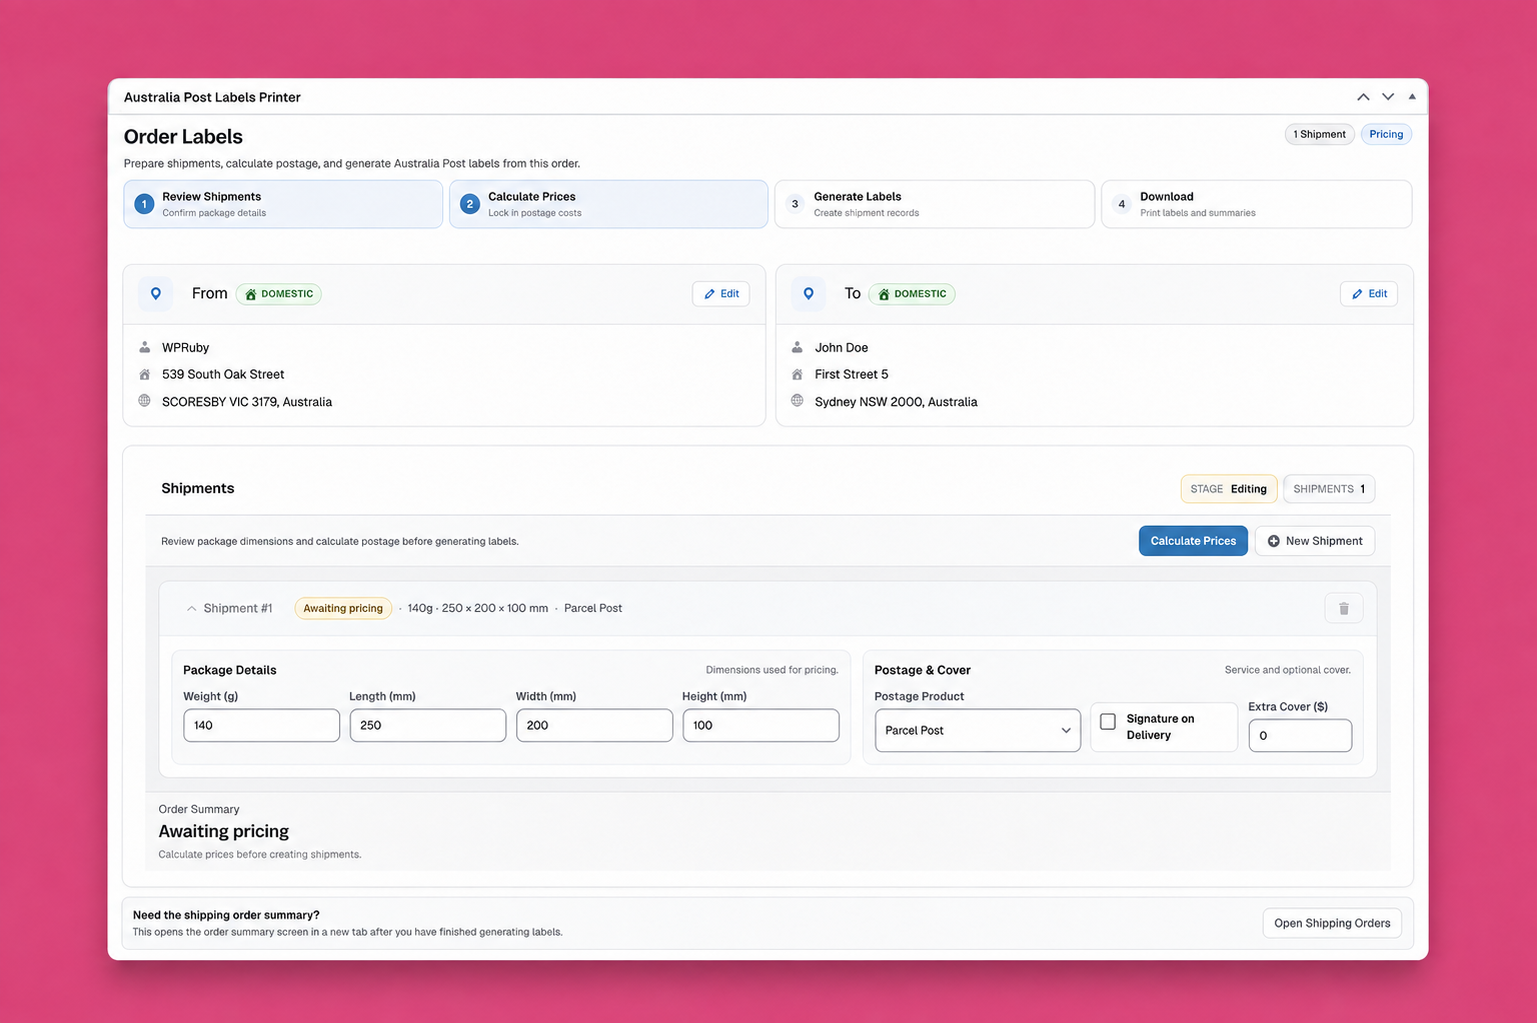
- Scroll to the Order Labels metabox
The printer shows a clear 4-step strip:
- Review Shipments — confirm package details
- Calculate Prices — lock in postage costs
- Generate Labels — create shipment records with Australia Post
- Download — print the PDF
Review shipments
Check:
- From address (store / business details)
- To address (customer shipping address)
- Package weight and dimensions
- Postage product (Regular, Express, Courier, satchel, international service, etc.)
- Optional Signature on Delivery and Extra Cover
- For international orders: customs / clearance details (HS tariff, origin, description, dangerous goods if needed)
Add another shipment with New Shipment if the order ships in more than one package.
Calculate prices
Click Calculate Prices. Labels Pro quotes postage against your connected Australia Post account and shows the total cost on the order.
If you change weight, service, or extras after calculating, use Reset Calculations, then calculate again.
Generate and download (MyPost vs eParcel)
The next click depends on your account type:
eParcel — one-click label
- Click Generate Label
- Labels Pro creates the shipment and generates the label in one step
- Click Download Label for the print-ready PDF
MyPost Business — create, then pay
- Click Create Shipment(s) to register the shipment with Australia Post
- Go to Australia Post Centre → Labels Orders
- Load the date range, select the ready shipment(s), and click Buy Label(s)
- Pay with your stored payment method or MyPost charge account
- Download the label PDF (from the order screen or Past Labels Orders)
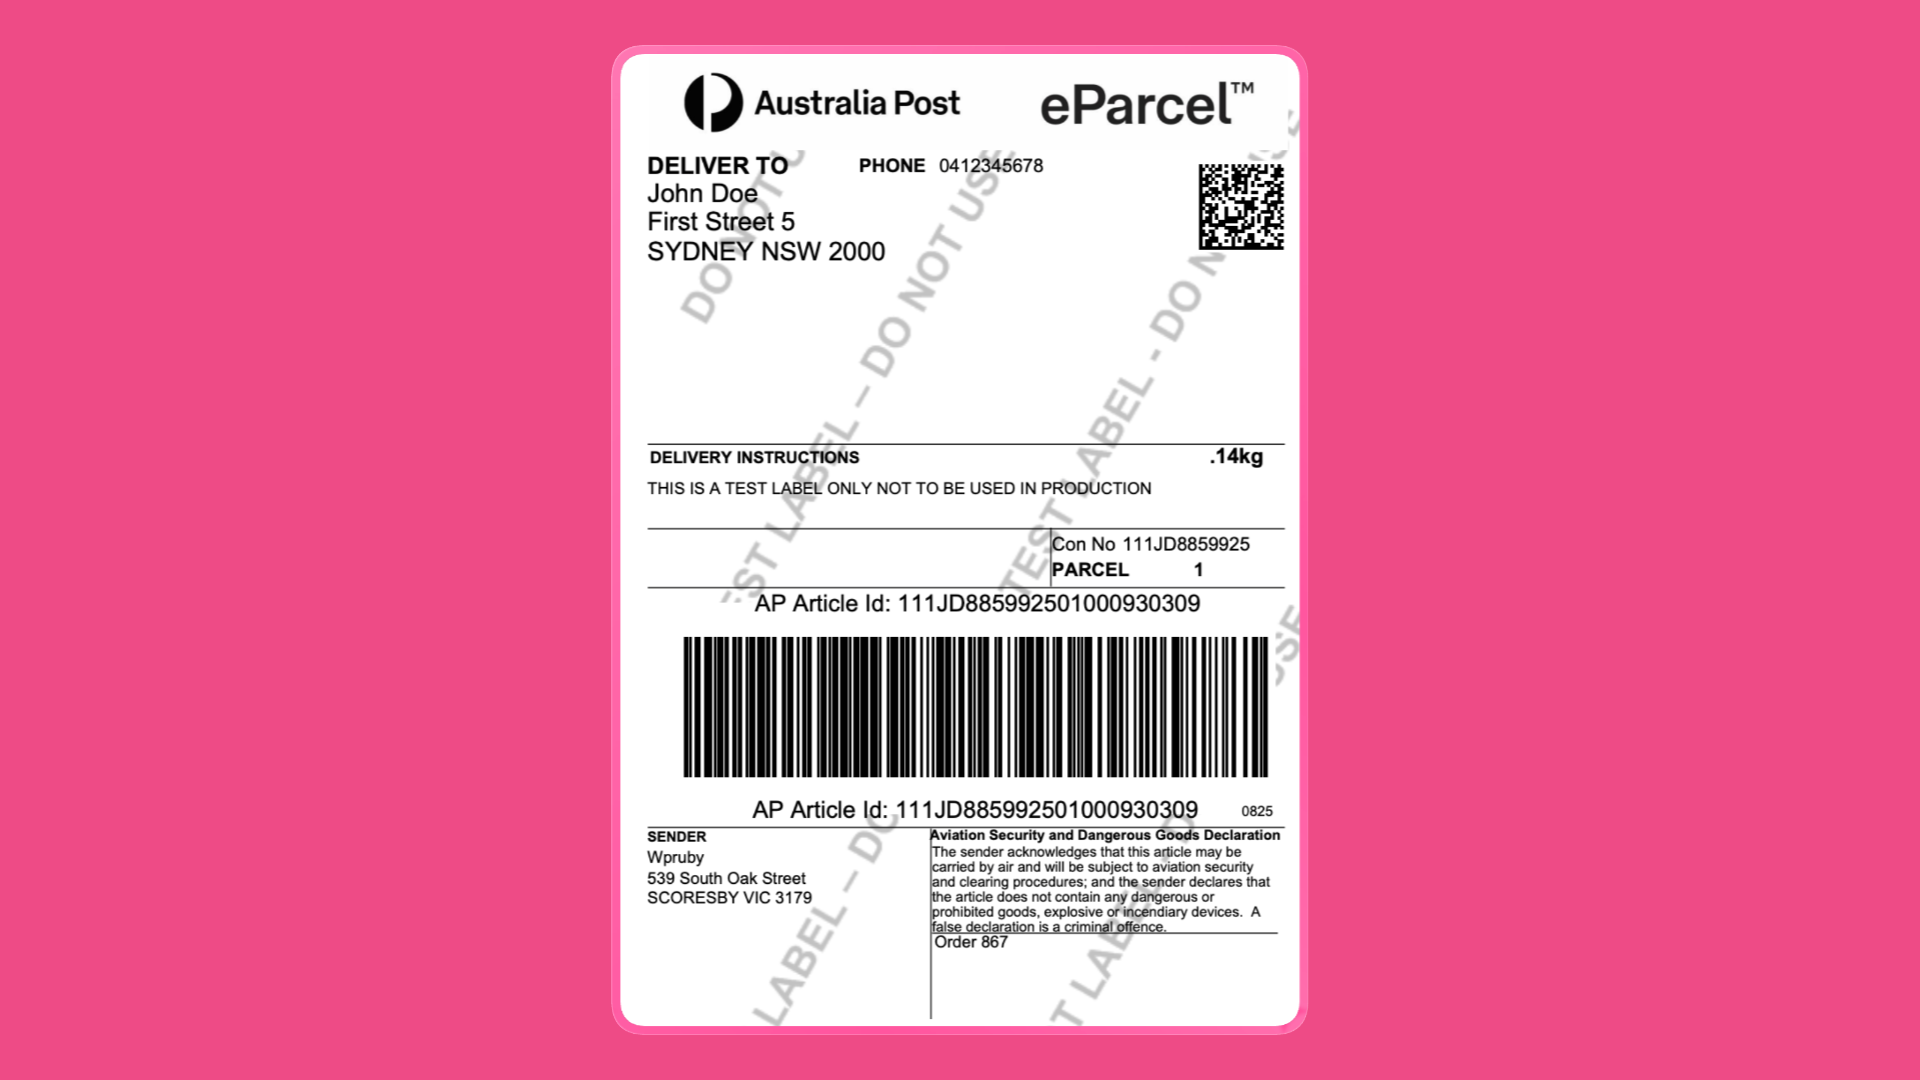
Tracking / consignment IDs are saved on the order. Customers get a Track action in My Account, and tracking appears on the order and in WooCommerce emails. Staff also see tracking in the WooCommerce orders list.
Step 3: Bulk print Australia Post labels (v7 workflow)
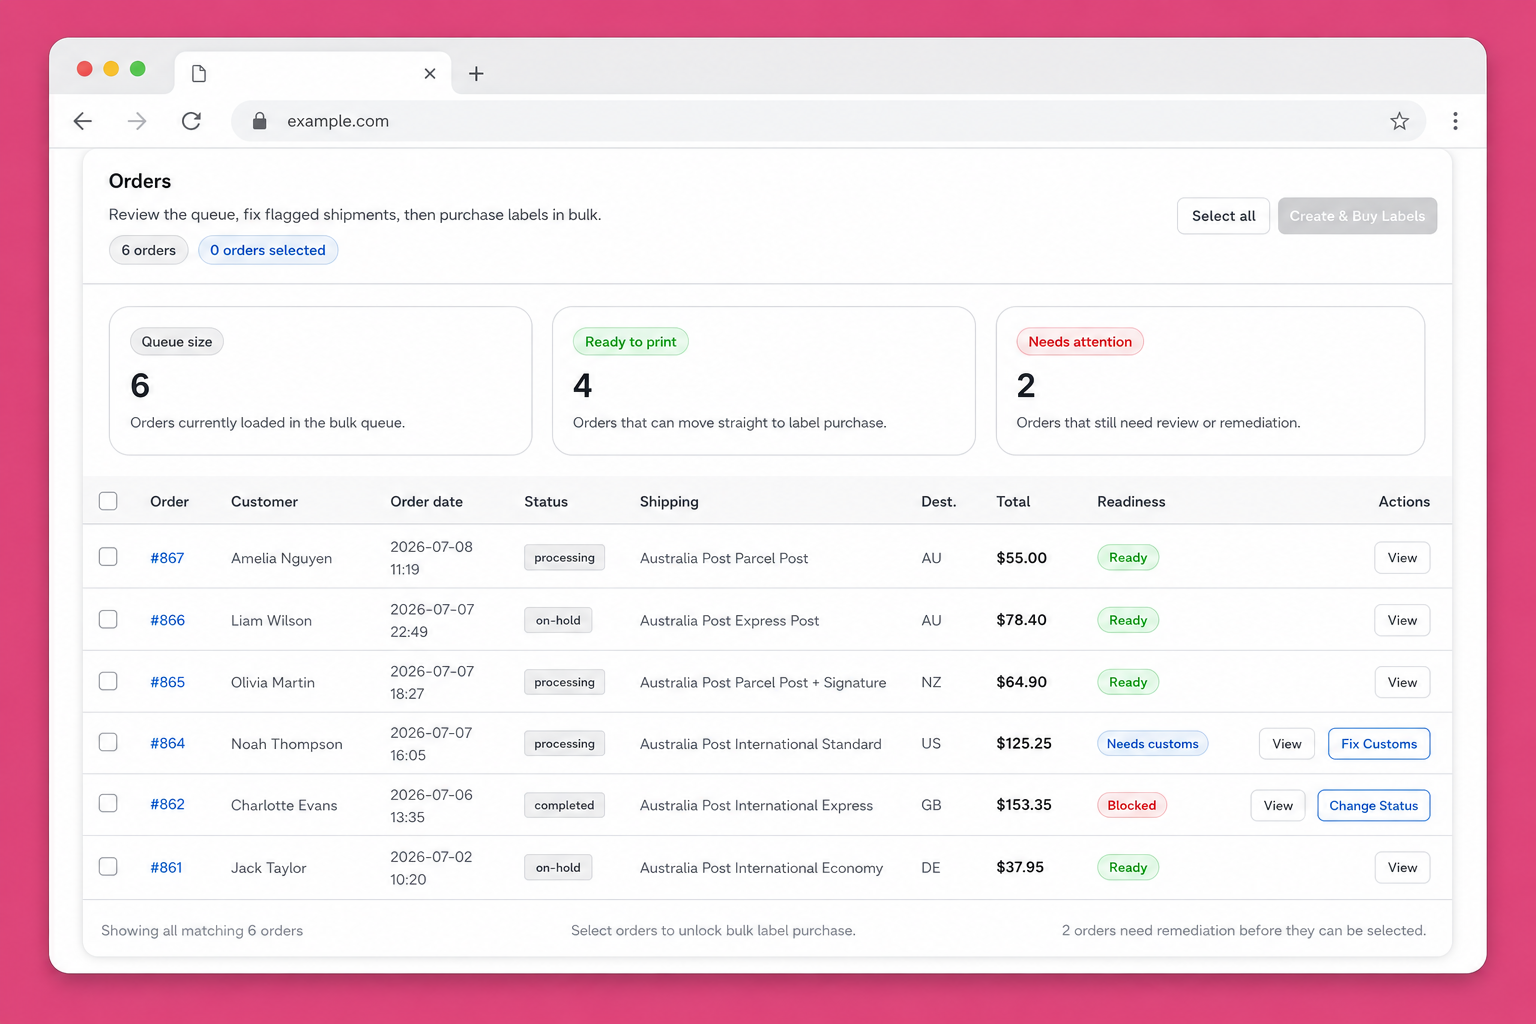
When you ship more than a handful of orders a day, skip opening each order. Use Bulk Fulfillment in Australia Post Centre.
Watch the bulk workflow
Open Bulk Fulfillment
- Go to WooCommerce → Australia Post Centre → Bulk Fulfillment
- Filter the queue:
- Status — Processing, On hold, Completed, or Any
- Destination — Domestic, International, or All
- Date range — today’s orders, this week, or a custom range
- Click Apply filters (or Refresh Orders)
Fix blocked orders in place
Each order shows a Readiness state. Orders that are ready can be selected. Blocked orders need a fix first — without leaving Centre:
| Problem | Fix in Bulk Fulfillment |
|---|---|
| Missing weight / dimensions | Fix weight modal |
| Invalid or missing phone | Fix phone modal |
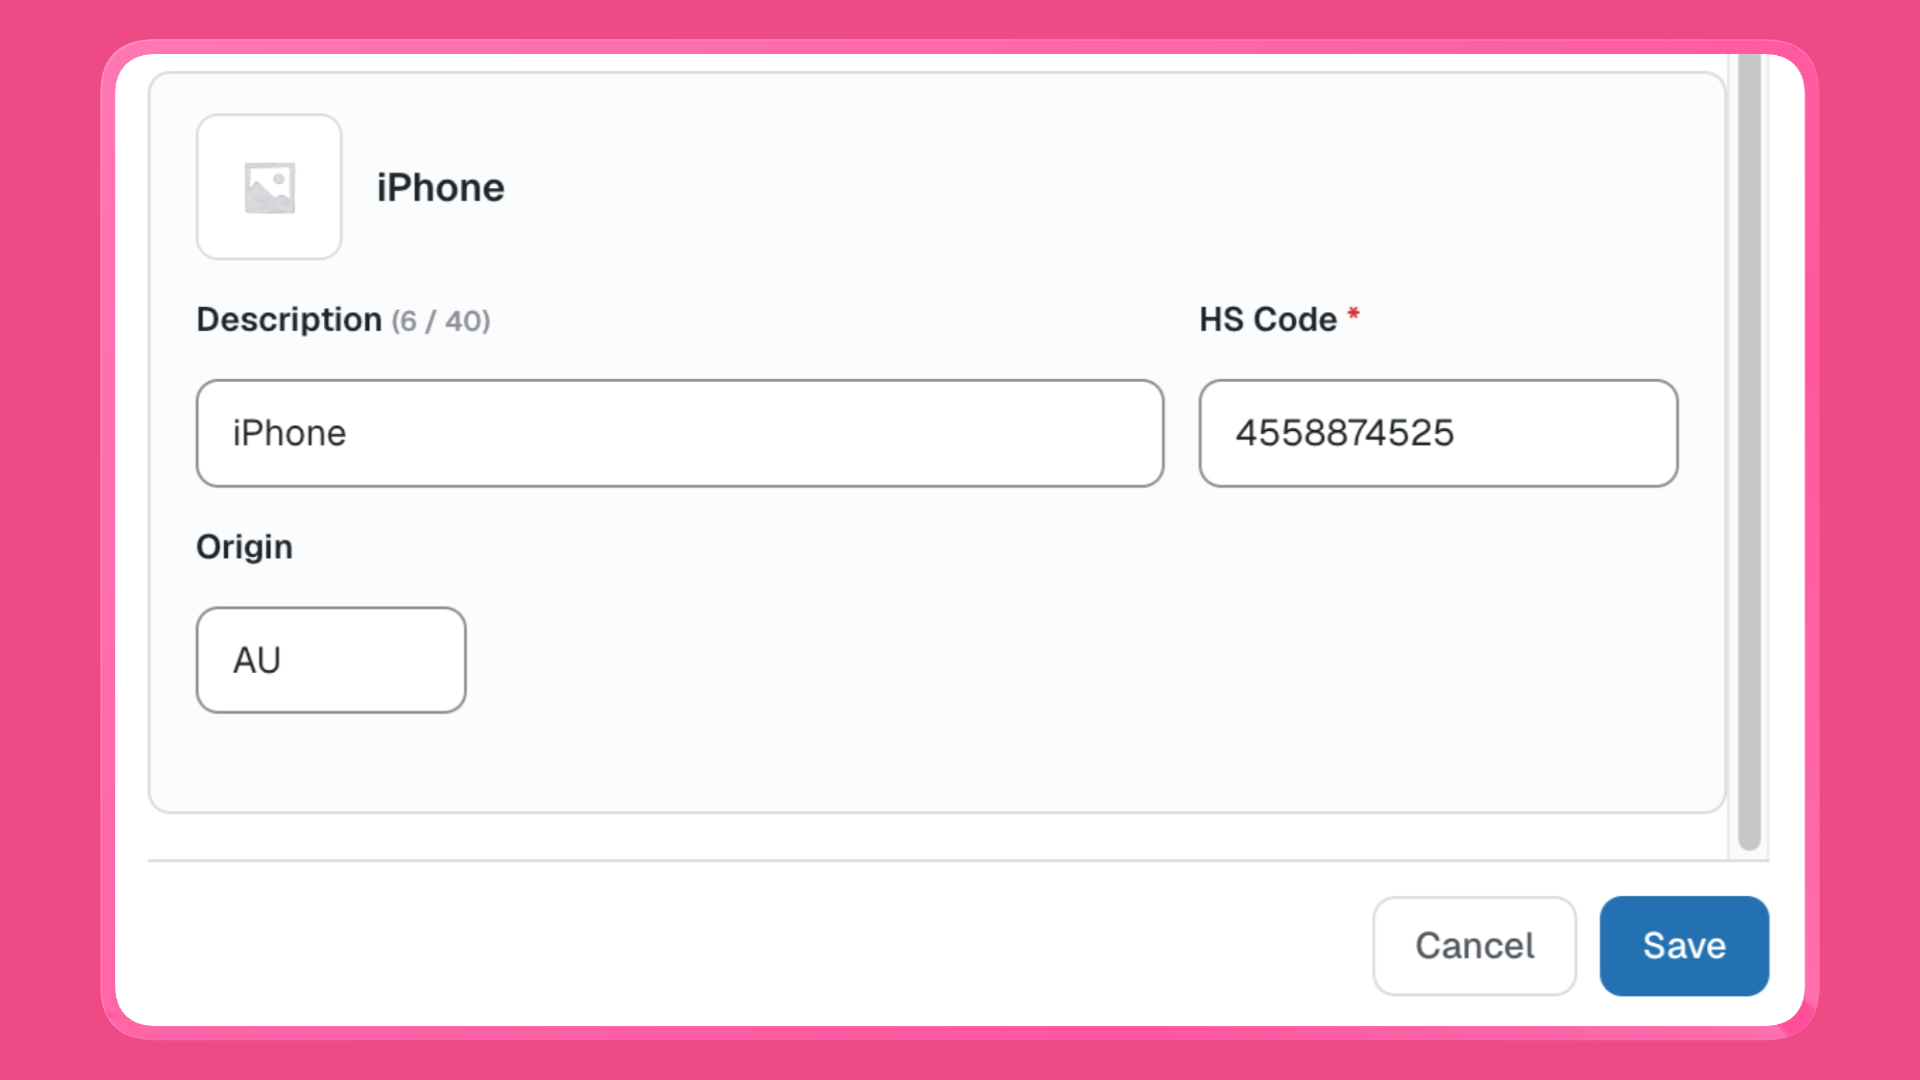
| Incomplete international customs | Fix customs modal |
Only eligible (ready) orders can be selected for printing. That stops failed postage buys before money leaves the account.
Create & buy labels in one run
- Select the orders you want (or Select all eligible rows)
- Click Create & Buy Labels
- Review calculated prices per order
- Optionally set bulk options for the batch:
- Postage product
- Signature on Delivery
- Extra Cover
- Confirm the purchase (eParcel can optionally create the shipping order and summary in the same run; MyPost bulk creates the shipping order as part of the flow)
- Download the combined PDF (
bulk-labels-*.pdf) and print
Optional: update order status after printing
After labels are bought, you can manually change selected WooCommerce order statuses (for example Processing → Completed) from Bulk Fulfillment. Status changes are manual — Labels Pro does not auto-complete orders when a label is created.
Step 4: Manage Labels Orders, reprints, and pickups
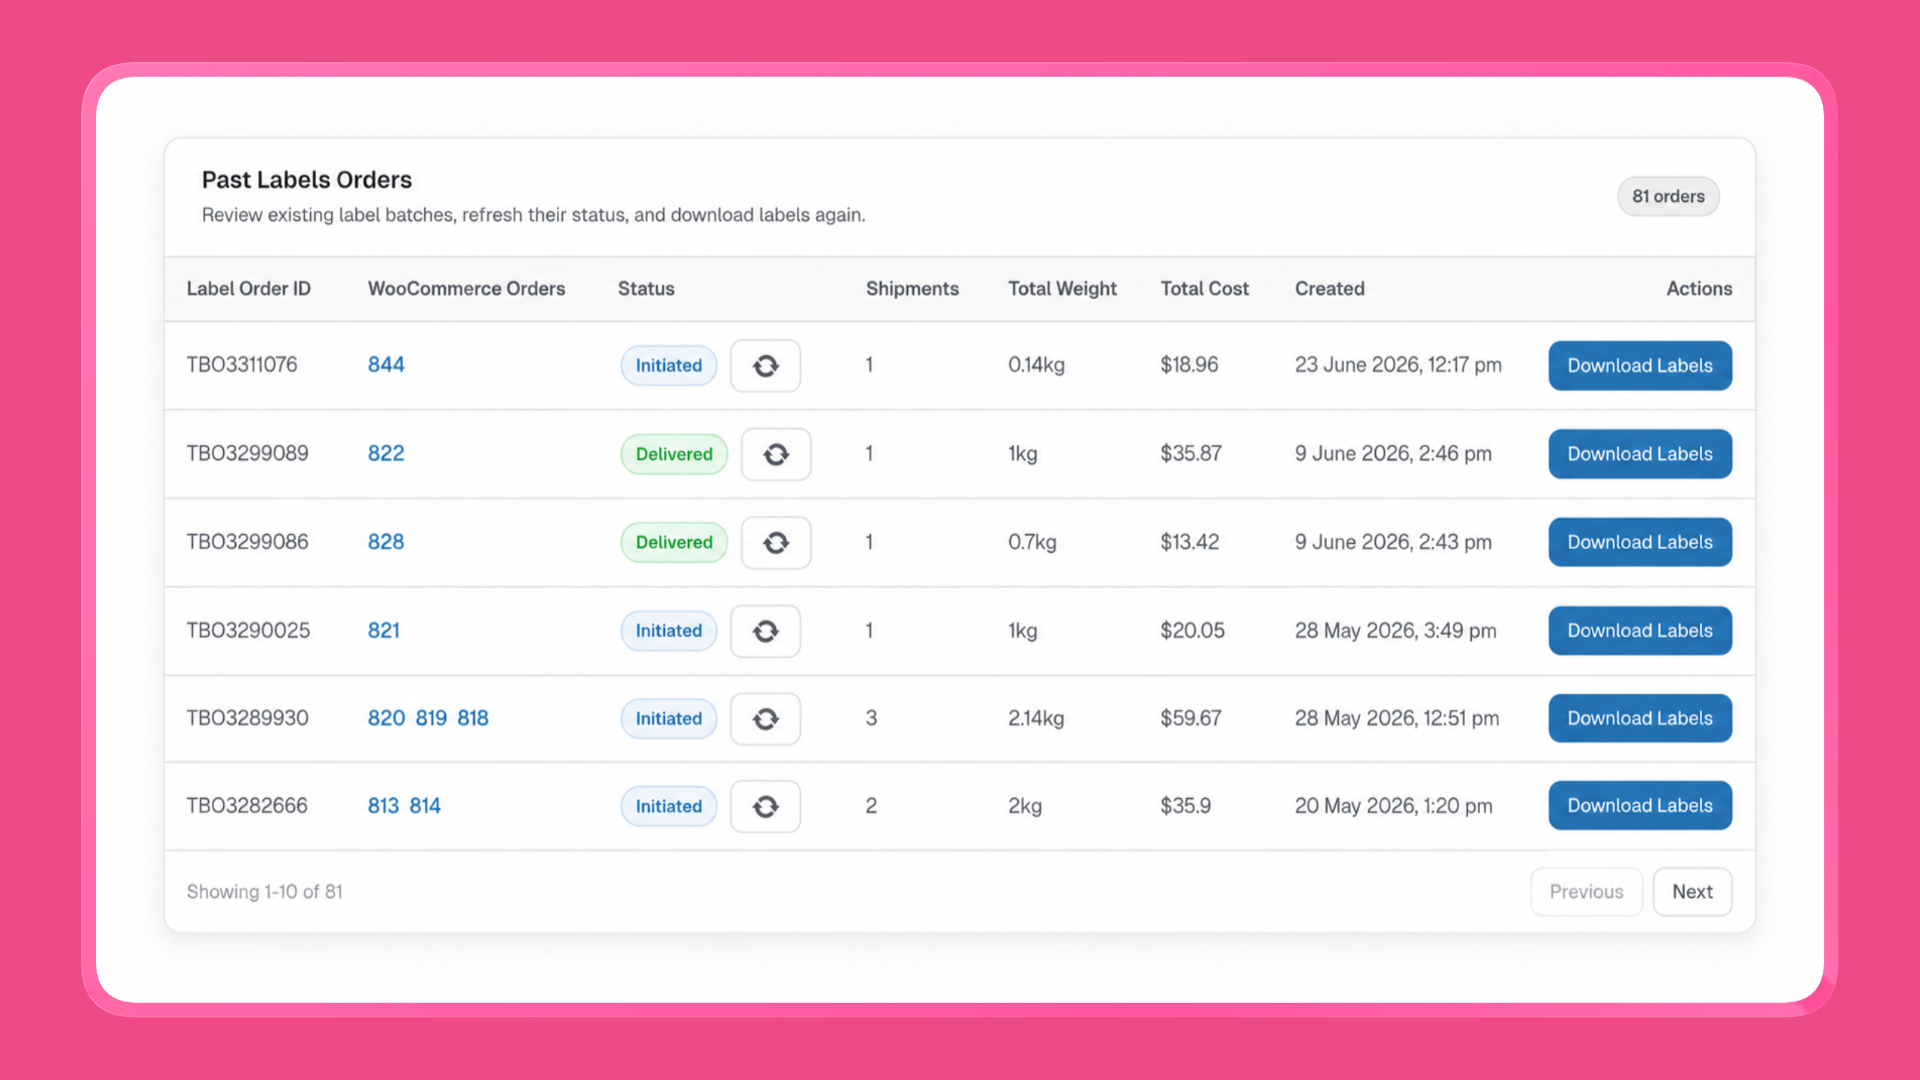
Australia Post Centre → Labels Orders is where paid shipping orders and reprints live.
Buy labels for MyPost shipments created from an order
- Filter by start/end date (or use Today / Yesterday / This Month)
- Click Load Shipments
- Select ready shipments
- Click Buy Label(s) (MyPost) or Create Shipping Order (eParcel)
- Download labels again anytime from Past Labels Orders
eParcel merchants can also download an order summary PDF for accounts / pickup paperwork.
Book a MyPost pickup
If you use MyPost Business, click Request Pickup on Labels Orders to book:
- Same-day pickup (PU1), or
- Next-business-day pickup (PU3)
You can allow unattended pickup and add collection instructions when needed.
Label layouts and extras worth knowing
- Layouts: A4 with 1–4 labels per page, or thermal A6
- Branded labels: Australia Post branding on or off
- Delivery instructions: customer order notes can be copied to the label (up to 128 characters)
- Signature on Delivery / Extra Cover: set per shipment (or in bulk for a batch)
- International clearance: HS tariff (6–12 digits), country of origin, item description, dangerous goods, and landed-costs payer
- Return labels: available for eParcel domestic (AU) shipments from the order printer
- Delete shipment: remove a mistaken shipment before postage is finalised
Quick reference: full v7 path
| Goal | Where | Main actions |
|---|---|---|
| Connect AusPost | Centre → Settings | Choose MyPost or eParcel → Connect / Verify → set layout |
| One order | Order → Order Labels | Review → Calculate Prices → Generate / Create Shipment(s) → Download |
| Many orders | Centre → Bulk Fulfillment | Filter → fix blocked → Create & Buy Labels → combined PDF |
| Pay / reprint / pickup | Centre → Labels Orders | Load shipments → Buy Label(s) → download; Request Pickup (MyPost) |
FAQ
Do I need MyPost Business or eParcel to print labels?
Yes. Labels Pro connects to your Australia Post business account. Public PAC rates alone are not enough to generate paid labels.
Can I print labels without enabling contract rates at checkout?
Yes. Contract postage is optional. You can keep live public rates at checkout and still print labels from Labels Pro.
Where did “bulk fulfilment” go in older docs?
In v7 it lives in WooCommerce → Australia Post Centre → Bulk Fulfillment, not as a separate plugin or buried shipping-method subtab.
Does printing a label automatically mark the WooCommerce order Completed?
No. You can change status manually in Bulk Fulfillment after printing.
Will customers see tracking?
Yes — tracking numbers from generated labels are saved on the order, shown in emails, and available via a Track button in My Account. Staff also see consignments in the orders list.
Stop copy-pasting into Australia Post
Australia Post label printing in WordPress / WooCommerce is no longer a spreadsheet-and-portal job. With Labels Pro v7 you calculate postage on the order, print one label or a whole day’s PDF from Bulk Fulfillment, and keep tracking inside WooCommerce.
Print Australia Post labels directly from WooCommerce → Get Labels Pro